Friday, November 30, 2012

Beef Teriyaki - Raw Pack Canning

Hey all,
I will polish this more tomorrow and make it pretty. Please note that this recipe is for my OWN use. It is not FDA tested and I do not recommend anyone, especially inexperienced testers use untested recipes.

This had a nice, light teriyaki flavor, not a heavy syrupy one. Feel free to doctor the dish after processing (see notes) to taste to tweak it.

PER PINT of cubed raw beef
Two tbl tamari or soy sauce (do NOT add salt)
1 tbl brown sugar
1 chopped scallions
1/4 tsp fresh grated ginger (powdered will taste different, be aware)
1/4 tsp granulated garlic
(red pepper flakes if desired)


PRESSURE CAN according to directions for beef.

Notes...

  • I tried doubling ginger and garlic. Don't.
  • the small shake of red pepper flakes I added didn't even make a blip, next time I kick it up
  • If using this much soy, allow slightly more headroom
  • To serve, scrape off any solid fat on top, dump in a pan, *add one more tbl of brown sugar*, heat through covered, on med high to high heat. Serve over rice & steamed veg.
  • If desired, before heating pour off sauce into a bowl and add some cornstarch to thicken. Then add to pan and proceed as mentioned.
  • If you desire more sauce (my husband did) add stock or water and a small amount of soy to the pan. Do not add just soy or the saltiness will overwhelm the flavors.

Thursday, November 22, 2012

A Goal Set: Thanksgiving Update


About a week after I wrote the post A Goal Set is a Goal Met, I brought my family to a Welcome Home Open House for Sensei Kayla Harrison -- the first ever US Gold Medalist in Judo. I had a blast watching both my girls take a judo class from Sensei Kayla and was giving them snacks when Sensei Kayla said, "Ok parents. Your turn ... Get on the mat."

I was using my cane that day but I didn't hesitate to line up with the other parents to begin the workout. Until I realized she was beginning with jogging to warm up. Crestfallen, I left the mat and headed back to my seat struggling not to admit how close I was to crying. Until that moment, I had no idea how badly I wanted to be out there And then something clicked.

I stood up and walked over to Sensei Riley and said, "Please. I can't do the warm-up ... can I still do the class?" He said, "Of course!"

And I did.

I needed someone to bring me my cane to get off the mat after the class but I know I was beaming. As I rested and waited my legs t return to something other than jelly, the dojo quieted down as they began to raffle off door prizes. I could hardly believe my ears when they called my number for the Grand Prize.

I won a month of free judo classes and a free uniform. I didn't even consider using the prize towards Maddie's  fees ... this one was mine. I walked up to Sensei Pedro to accept my prize with my cane and he looked me in the eye with a smile, "You going to do this?" I grinned back at him and said, "Yes."

I set a goal. I would do a month of judo. I would get there at least once a week for a month, if it meant I had to have family drive me, if I had to go up and down those damn steps on my butt. Where I usually share everything exciting on Facebook, I kept this goal private. Telling only a few people, I drew on family, friends and my Fibromyalgia support group to keep me going those first few classes. Sensei Riley helped me chose classes where he would be able to help me modify the exercises ... he often offered to help me get down the stairs after. I felt safe going to his classes knowing that he had seen me struggle up those steps enough to understand the severity of my weakness. Many times I went to the Women's Workout class, which focuses on weights, core strengthening hardcore exercise and using judo for self-defense. I loved every exhausting, muscle-shaking minute. Inspired by how much enjoyed the classes, my older daughter Audrey joined Maddie and I on the mat. I was thrilled to hear that staff at her school have noticed the change in her - she walks with a new a happiness and confidence.

It has been two months now and I'm still going. Last week I was finally able to actually jog for the warm up for the first time. Today is Thanksgiving in the United States. I have many amazing blessings I have in my life, but I wanted to take a minute and post that I am thankful to Senseis Pedro and Riley for the chance to try and the encouragement to succeed.

Happy Thanksgiving!

Updated 11/27/2014 A Heart Full of Joy

Updated 6/23/2015 Giving Thanks. 2015.

Saturday, November 17, 2012

From Scratch Chicken Divan

For some reason I was crazy in the mood for Chicken Divan tonight. I never buy condensed soup mixes so I created this recipe to use what I had in the house. And it was so incredible. It's too bad for the children that they didn't like it because I made a second pan for the freezer and they will just have to cope.

This recipe makes two square pans or one large 9x13 pan. Notes on preparing a pan for the freezer included below but I haven't tested my freezer pan yet.

Chicken Divan
Preheat Oven to 350F


Ingredients

2 cups cooked rice
Some cooked chicken (I used one quart sized jar but honestly, however much chicken you want to feed your horde)
One Med to large head of broccoli (you can also add in or substitute cauliflower, romanesco or asparagus), steamed (I steamed in the micro)
Two shallots sliced
1-2 tbl butter
4tbl wondra or white flour
2 cups chicken broth or stock
1/2 tsp each curry and mustard powders
1 tsp granulated garlic
Salt and pepper to taste
1/4 cups each Mayo and Greek yogurt 

1-2 cups mild shredded cheddar cheese
Breadcrumbs
In a small pan melt butter; saute shallots until soft
Add wondra, stir well (will look awful)
Over low heat, add one cup stock, mix well
Stir in spices, Mayo yogurt, stirring well
Add last cup of stock, stirring
Add broccoli, chicken and rice to pan, layering or mixing as desired
Pour sauce over top.
Top with cheese then breadcrumbs
Cover w foil, bake 30 min or until it begins to bubble. Remove foil for last 10. 


To prepare for freezer, I added the rice, broccoli and chicken to my pan, STOP, and cover with plastic wrap and then tin foil. From what I read on the web, the rice would absorb the sauce while freezing/thawing so I've kept them separate. Allow sauce to cool and place in a separate freezer safe container (I use BPA-free Ziploc Perfect Portions bags). Add shredded cheese to another freezer container. I stuck them all in a jumbo ziploc (including the pan) but you could do whatever you want to keep them together.

When ready to assemble, thaw the pan and the sauce however you normally choose to (if you usually pop your glass pans in the oven frozen, do so BEFORE preheating your oven to reduce the whole exploding glass pan odds). Pour sauce over stuff in pan. Consider adding some chicken stock or milk if you want it more soupy. Top with cheese and then bread crumbs and cook.

ETA: I cooked it from the freezer as above (thawing a bit in the freezer first) and holy moly - it was  better than the first time.

Friday, November 16, 2012

Happy Holidays!

As we are getting closer to the December holidays I need help diseminating the kid's wish lists to various loving family members.

Somehow.

My children are the oldest grandbabies on both sides, so at this time of year I'm concious that how I approach things. Luckily, I embrace the wisdom of "set the bar low, baby". As my girls get older I realized they really didn't know HOW to start thinking about what to ask for. Where do they start?

Inspired by Pinterest, I've created this for my girls... we aren't planning on limiting them to these choices. This is in addition to their regular list to help them focus and let us know what really matters to them.

Wishing you a mellow, low-stress, full-of-love holiday season.


Thursday, November 8, 2012

Anger, Politics and Applesauce

Two days after the 2012 US Presidential Election, I have a massive crockpot full of cranberry apple sauce beginning to warm in my kitchen. The apples are all locally grown - some from the amazing people at Farmer Dave's CSA, others picked by my family on a wonderful fall apple picking trip.

Some of you know I cook and bake to cope. I think today may take more than applesauce. Until I had children, I've never been particularly motivated but like much of the country I became deeply invested in the results of this year's decision. 

Well, it's done now. Some of us are elated while some are devastated. What I am feeling is known to my friends but is not the point of this post. Right now I'm focused on the fallout.

Today an already grieving friend was been emotionally and verbally abused under the guise of political expression. She contacted a friend to ask a completely non-political question and her close friend responded with a barrage of hateful texts regarding my friend's political choices. I'm touched by the grace with which my friend stepped back from the contact and leaned on her community to support her in her pain. 

So here is the point of this post.

If you are angry enough over this election to consider attacking or verbally abusing another person (whether they are a faceless online friend, family or a long time friends) take a breath and realize you are in over your head. You need help coping with your anger, grief and loss. Grief is not just about a loved one dying - grief can stem from the loss of hope, the death of a dream.

Please, PLEASE consider contacting someone at one of these resources.

http://www.mentalhealthamerica.net/go/help


http://www.yourlifeyourvoice.org/aboutus/Pages/3WaystoGetHelp.aspx


http://www.healthyplace.com/other-info/resources/mental-health-hotline-numbers-and-referral-resources/


There is never, ever a reason strong enough to abuse anyone. If you are feeling out of control, reach out for help.


Rather than responding emotionally to vitriol spread on the web and in person, consider feeling compassion for a person so clearly unable to control their anger and cope with their grief. Share this page. And maybe bake something. Me, I'm going to go add a bit more brown sugar to the crockpot ... and maybe bake some muffins.

Thursday, September 20, 2012

A Goal Set is a Goal Met

I was never a stellar athlete.  If you've read my posts and have a grasp of my limits, you'd never believe that I've enjoyed sailboarding, canoeing, freestyle karate, kickboxing, Judo, tai chi, softball, gymnastics, tennis, soccer, competitive ballroom dancing, basketball ... you get the idea. I was never particularly remarkable at any of them but they all added a color to my life that wasn't there before. Still I kept seeking until I found my true love -  yoga. After fourteen years of practice I often wonder, "What if I hadn't been so determined to find my niche?"

The summer my children were six and three, I decided I wanted my kids to try new things during vacation. My eldest had been begging for gymnastics so we opted for that as one activity. For something completely different we decided to add in a summer course of karate at a local facility.

The moment Audrey's feet hit the mats at gymnastics, her eyes began to shine in a way I'd never seen. My sweet six year old had tried many fun activities before but as soon as the novelty wore off, Audrey would become distracted and lose interest. I couldn't believe the difference with gymnastics! Audrey beamed through the whole class and bounded off the mat full of joy and pride at her new skills. Thankfully the gym had fantastic class times and I was able to schedule her at a time when her Dad was home to drive her. No brainer!

Maddie, on the other hand, fell hard for karate. At the end of the summer, I realized I was just not physically able to get her to two karate practices a week during the school year -- especially since I still wasn't driving. I took a deep breath and said, "Someday, but not now." Disappointed, Maddie took it well and over the next two years enjoyed dance, gymnastics and swimming. She excelled at everything and enjoyed her classes but kept asking, "Mom, when can I take martial arts again?"

I had planned to wait until third grade, until she was old enough to understand the commitment that a martial arts practice entails. Maddie had other plans. This July I was blindsided by big blue eyes, pig tails and the firm words I hadn't expected to hear. "Mom, if I quit dance and gymnastics, can I PLEASE take martial arts?" It seemed that my kiddo was ready for martial arts far earlier than I expected.

I remembered being younger than Maddie and my father teaching me Judo falls and rolls to protect a fragile bone in my arm and my husband and I decided it was time. We are lucky enough to have a Judo dojo one town over (within my driving distance) so we set up a trial class for Maddie. There was only one thing in Maddie's way.

Stairs.

The only way to get into the dojo was for me to climb up a monster flight of stairs - and half the classes were at times that couldn't rely on my husband for help. The first time I did those stairs my head spun, knees went weak and my legs turned to jelly. Anyone else could simply work harder and get used to it, but I had to gauge things carefully - would I be able to safely drive home after those stairs? Can I commit to this?

That day I watched Sensei Riley McIlwain work with Maddie on the mat, saw him connect with her and get her to glow with confidence. Sigh. No brainer.

That was a few months ago. Getting up those stairs has never been a "Can I?" Getting up those stairs is a gritted-teeth "I WILL". Last night Maddie had a chance to go to her first open gym class run by the gym owner, Sensei Jimmy Pedro. Among many other accomplishments, Sensei Pedro is a World Champion, twice Olympic medalist and recently coached the 2012 US Olympic team to the first ever US Gold in Judo in London. Open gym generally focuses on one judo technique and one leadership theme, and is open to the smallest Little Dragons all the way up to the blackbelts.

After warming up, Sensei Pedro spoke to the students about the evening's theme: Goal setting. A primary part of studying judo at Pedro's Judo is learning to set goals and meet them. Little Dragons are expected to set a goal with their parents for something to accomplish at home. Together they write it in their attendance book, committing to work on it outside of the dojo. This practice continues no matter your rank or age.

"A goal set is a goal met," said Sensei Pedro, continuing "When you want to accomplish something, write it down. Put it on your door or your wall." I looked at my own Little Dragon sitting next to black belts who had competed all over the world, my own little Maddie, listening to life lessons across the mat from Sensei Travis Stevens of the 2012 US Olympic Judo team.

Those stairs were brutal last night and the effects have hit me hard today. Absolutely too tired to drive, I had to rest for an hour before I was strong enough to load the dishwasher. As my legs wobbled at the kitchen counter I thought back to Sensei Pedro's words last night. "A goal set is a goal met."

Living with physical limits is tough on a person. Duh. But few people think about what life is like for a parent with physical limits. "I'm sorry, we can't..." becomes a standard part of their lexicon. We are not only challenged with raising strong, compassionate children like every other parent, but we are are also entrusted with helping our children grow up resilient, determined, patient, thankful and not resentful in a life that is limited by someone else's pain and weakness. In this house you don't get an allowance for picking up your markers. You pick up your markers because mom uses a cane and could get seriously hurt. Period.

I will get Maddie to Judo, just as I continue to get Audrey to gymnastics. Often I will have to grit my teeth to make those stairs. Sometimes I will really pay for the strain the next day. But last night my efforts were rewarded with seeing my daughter learn more than just Judo from a world class instructor. She wasn't the only one learning from him last night. A goal set is a goal met.

Maddie with Sensei Jimmy Pedro 9/19/2012


Updated 11/22/2012 A Goal Set: Thanksgiving Update

Updated 11/27/2014 A Heart Full of Joy

Updated 6/23/2015 Giving Thanks. 2015.

Wednesday, September 12, 2012

Maddie portrays the stages of grief. My II Week post

Setting: Living room

Maddie remembers she has $13 in saved money tucked away. I am folding clothes and try to divert her with a chance to earn more money.

Maddie: Mommy, can we go to a store so I can buy a new baby doll?

Mommy: Sorry, hon. I have too much driving to do to day - I can't make an extra trip. I'm hurting too much and too tired ... I need to get cat food from the vet, drive you to Auntie's and Audrey to her appointment and  then I still have to getyou to judo. Would you like to earn a quarter putting these clothes away?

.... and it begins...

Bargaining
Maddie: But mom, maybe we can stop at a store with dolls ON THE WAY to the vet, or the appointment, or judo... and I'll do the clothes for a dollar.

Mommy: Honey, I'm sorry but there just aren't any stores on those roads that have baby dolls. And I can only give you a quarter. It's a small pile.

(Momentary) Acceptance
Maddie (face turning red, eyes filling with tears, takes deep shuddering breath): Ok, Mommy. I don't want to do the clothes.

Maddie then walks quietly to her room, shuts the door, sits against the door and begins...

Depression
The wailing begins, this time directed to her dolly, DeeDee
I hear various combinations of "Noooooooooo nooooooooooooooo .... wahahahahahahh ....Oh DeeDee..."

Mommy: Maddie, do you want a hug?

Maddie (in a drawn out wail): No thank yooooooooou.

Mommy: Hey, the pile is bigger. Would you do it for two quarters? That's half of a dollar...

Maddie (suddenly alert): Can I do it for three?

Mommy: No Maddie. It's less than a whole basket.

Anger
Maddie (frostily): NO. THANK. YOU. (muttering) Did you hear that DeeDee? No baby for us today. No dollar. (mutter mutter mutter)

This goes on for a while behind her closed door until...

Acceptance
Maddie sniffling and tired, leaves room and approaches mom

Mommy: You ready for a hug yet?

Maddie nods and climbs on Mommy's lap. Long snuggle.

Mommy: You know what means the most to me, Maddie? You were upset, angry and disappointed but not once did you argue with me. You respected me and you respected my fibro and that makes me feel loved and understood. Thanks, angel.

End Scene.

For folks familiar with the Kubler-Ross model of stages of greiving, you may have noticed one stage was missing. Denial.

Many people tell me, "Well at least your children will grow up learning compassion." I don't know about that.  They will learn compassion from the people who are compassionate towards me but honestly, it's pretty tough for me personally to model compassion for them. I try, but I'm not miraculously more compassionate than any other parent. Today shined a light on what my children WILL gain from having a mom with an Invisible Illness. My children are learning to embrace reality to find its beauty and joy, to accept its grief and loss ... how to process pain and keep living. My children are learning resilience.

Thank you, Maddie, for this beautiful lesson. When I am as sick as I am this week I often can only see what my children miss out on because of my illness. Thank you showing me what you gain.


Saturday, August 18, 2012

Little Words

My two year old niece, Beatrice Patrica (yes, she is often called by both names - she's a wily one) is ... verbal. At 18m if you asked her what she liked to eat, she'd tell you crudites. Seriously.

Bea speaks in a tiny quiet voice (her screams are a very different experience) so I find myself going very still to hear what she has to say ... it's always worth it. This week my sister was getting Bea ready for bed and telling her about a friend's "teeny tiny kittens".  Beatrice began to chat, "... and the little tiny kittens were playing, and the Auntie Kitten was knitting a sweater..."


I love you, Bee-ah :)

Monday, August 13, 2012

Rocking the freezer - single servings of chili

I have a picky kiddo that needs huge amounts of protein ... in small portions, many times throughout the day. Add in that I can't stand/cook for long periods of time or frequently during the day and that I can only shop about twice a month and it gets a bit challenging. Honestly, it's like a Parenting SAT question. Thankfully this kiddo loves homemade chili. A few months ago I stumbled on a great system for freezing perfect sized portions of chili so that I can just defrost enough for her.

Folks who know me understand that I'm very cautious about plastics and food storage. I tried freezing small portions in glass containers but I disliked the amount of freezer space they took for storage. They also were a bit awkward to defrost. So color me tickled when I stumbled on these in the plastic bag section of the market...


These are small, thin, plastic bags with no zipper. They are extremely economical, easy to remove food from and - my favorite - BPA-free.


I then added this to the equation ... my 2" cookie dough scoop. This handy little gadget is great for making large cookies but it's also fun for scooping rice or other foods. It holds about 1/4 cup so it's easy to gauge portion size if that matters to you.


So what did I do? I nestled the bottom of a bags into one cup of a muffin tin and then scooped two scoops into that cup and patted it down. I flattened the rest of the bag into the cup next to that one and   made another little chili muffin. I gently patted the bag down so it wasn't too full of air pockets, twisted the bag and clipped it closed. I used these fancy little doohickeys I found at Ikea but regular twist-ties will work as well. Repeat for all the chili you have and then freeze until solid. When frozen, pop all the bags out of the muffin tin and store them in your preferred large freezer storage product (glass, freezer bag etc).

Half cup portions are perfect for a mildly hungry Audrey and if she's really starving I can thaw two instead. And a well fed Audrey is a happy Audrey :)


**I am in no way connected or receive reimbursement/product/kickbacks/magic powers from any of the companies mentioned here. All products mentioned were purchased by me or by the fabulous chiquita who shared her pic, generally using standard shipping which I immediately regretted as it takes too flipping long.**

Thursday, August 2, 2012

Letters to my Daughters

Dear Audrey,
Ah my love, it is hard to be different. You are smart and colorful and so incredibly soft inside. I remember you coming home from first grade having been teased about loving the colors chartreuse, vermilion, magenta and aquamarine. You get that from me, love. I remember being called Webster because I loved reading the dictionary. I watch you do these same things, missing the same social cues I missed (and still miss...) and I see a very fancy target painted on your sweet little back.

I see you dealing with bullying in many forms. I see you not understanding how to fit into a group at the playground, feeling left out because you can't figure out how to join in. I hope and pray you find a way to be strong without holding power over someone smaller, more fragile than you.

I have hope.

Not that you will fit in or be any different than you are, or that you will fit in or be any less sparkly than you were born to be. I have hope that you will find other hedgehogs like you. Prickly on the outside, soft and unique underneath. I have hope that the work parents and educators are doing towards changing the face of bullying continues. I hope that no matter who you turn out to be, who you love, how you love, that you will feel strong and confident in your choices and yourself.

I have hope that someday you will talk to your children and try to help them understand how when you were little people were still told who they could love. And I hope it will be so freakishly foreign to them and to you that you have difficulty explaining it all.


Dear Maddie,
You are a such an amazing, vibrant little girl. I see how you walk into a room and instantly have friends, how you find people who are left out and gently ease them into the play. I see your bright mind and hysterical sense of humor and love watching you throw yourself hard into everything you try. I can't wait to see you enjoy work and school in ways I never could. I see you confused by your sister's difficulty joining in, hurt by her prickles, worried for her pain.

My hope for you is that you learn to understand how she feels, how those who are different, excluded, marginalized ... prickly ... that sometimes they are not choosing their path. How sometimes prickles are something they are born with. I hope you find happiness in your strength and not let those who would try, hurt your huge, squishy amazing heart.
~~~

We as adults are spending so much time reading, learning and teaching about bullying. And tonight while I should have been sleeping, I had a thought. If my future teenage Audrey was forced by stronger, more powerful, scary girls to give up a boyfriend she cared about ... that would be bullying. We are giving her tools now in her young life to protect her against those Mean Girls that would belittle her and degrade her choices.

But how is that different than a powerful, scary group of adults telling a person they can't marry their gay lover? How can we claim to teach our children not to bully others when adults still bully adults?

I still have hope. I have hope that small groups of people will make a small difference in small communities. And that small groups will become larger. I have hope that my children will watch freedom and the elimination of social bullying change over their lifetime. I have hope that adults who find their lives fitting easily into the norm, like my Maddie, will find compassion and strength to support those who are less strong and who need advocates.

Saturday, May 19, 2012

More on Addi Lace Clicks- Long tips & Life Line Feature!

So by now you've probably figured out that I am partial to interchangeable knitting needles. If you are wondering if interchangeable knitting needles are right for you, hop your pretty little heiny over here to read my post about How to Buy Interchangeable Knitting Needles.

One popular brand of knitting needles is Addi by Skacel. Back in November 2010, Skacel released their long-awaited Lace Interchangeable Knitting Needle set. What made it a "lace" set? The point of the needle was long and supah-sharp, perfect for grabbing teeny tiny stitches and flipping them through the acrobatics of lace knitting. I happened to be at Stitches East for a few pathetic hours the week they were released in the US ... so I snagged me a set. My online knitting cronies clambered for the scoop on the Lace Tip set so, for Jillian, I wrote this Addi Lace Click Review.

So it's been a year and a half now and I have a few updates.

On the original Lace Tip Set...
These needles are one of the few sets of interchangeables that allow for small circumference knitting. If you've ever used small circumference fixed circular needles, you know that the needles themselves have to be shorter to be able to get that small circumference. Addis Lace set comes with cables that when combined with their tips, will make both 16" and 20" needles. Addis was apparently trying to hit this niche market of small circ knitters at the same time as satisfying the lace tip lovers.  Oooooooookay.

For those who love small circ needles, this set rocks. Unfortunately, I've met a number of people who complain of hand pain due to the shorter size. Despite this, I still reached for my Lace Set often. The sweater that was going on forever? Holy smokes, it flew on those needles. But they hurt. They hurt enough that I would often have to put down a project in frustration.

The other complaint I had was the join. It catches, man. Not a smooth join at all and with the wrong yarns, my knitting continually got hung up. So why the heck was I still reaching for them? Ultra sharp tips, and a surface that I just grooved on. I actually increased in speed with these needles ... and for a slow knitter, that's a very cool thing. 

When Addi came out with their recent Long Lace Tip Set, I realized, Hm. This could make me very very happy. The original Lace Tip set sold quickly on eBay and Momma ordered herself the new long needles.

And so, on the Long Lace Tip Set...
Oh mama. The needles fit perfectly in my hands. My hand pain disappeared with the first use, completely shocking me. I was thrilled to be able to finish projects faster because I could KNIT MORE! Woot! I was slightly saddened that they weren't able to improve their join but in order to make the locking mechanism work, I think the current join is as good as it is going to get for the foreseeable future. So I found a situation in which this join completely pissed me off: real lace.

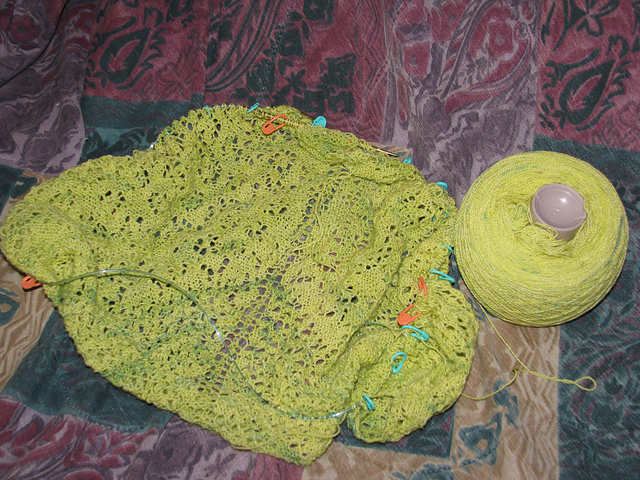
You'd think that a set with Lace Tips would find away to fix that join, but in actual practice, lace weight yarn simply can't skim over it. At all. I picked up a hibernating work in progress (see my Lime Rickey Summer Shawl project page over here) using Susan's Spinning Bunny Merino-Tussah Silk lace weight. This is an amazingly well plied yarn, soft but not draggy or splitty, on size 4 needles. In this old picture you can actually see that it's on a set of fixed Addi lace circs.


So the grand irritation of the Addi Lace tips - original or long - is that in my opinion they are completely useless with lace weight yarns. I'm sure that other people might not have this problem. I've only been knitting a few years and am definitely not as accomplished or coordinated as many of my friends so please take my opinion with a grain of salt. I will keep this set and use it very frequently, but not with laceweight. 

The other fun feature of the new Long Lace Tip set is the Life Line feature. Never heard of a life line in knitting? Especially common in lace knitting, inserting a life line (a horizontal thread run throw an entire row of active stitches) lets you quickly rip back to a particular place in your knitting as opposed to tinking back stitch by stitch. Addi made a clever addition to the cables in the Long Lace Tip set by adding a teeny longitudinal slice to knitting cables. The idea is that you feed your life line material into that slit and simply knit as usual, with the life line being laid as you go. I've been told that waste lace weight yarn, embroidery floss and crochet thread are good choices for life line materials. I went for waxed mint dental floss, borrowed from my mom's medicine cabinet. Not the best choice, but hey, it'll do in a pinch. And my shawl is minty fresh.


This is a close up of the cable so you can see what the hoo-hah I'm talking about. It actually holds the life line material really well but threading it, well that is another matter. If you are going to use this feature, I reeeeeally recommend using one of these... 


This picture is from How to Use a Needle Threader on About.com and if you've never used one I highly suggest you go over there and have an "Aha!" moment. I don't need them often, but needle threaders are fantastic tools for those really splitty threads that make the little vein in your temple throb.

Feeding dental floss through that little slit in the cable while trying to carefully pinch the cable in a way to keep the slit open. 


So here is the dental floss life line in progress. You can see how the floss just feeds along with the stitches. I can honestly say that laying the life line itself was completely effortless. 

The dental floss was not the best choice in life line material however...

See that snarl? That took me a half hour to tease out because if I pulled to hard, the thin plastic floss just stretched... and would snap. There was much cursing. Sigh.

Feeling very proud of myself, I decided to nail down a few more rows and take a lovely picture to share with y'all. And then I stumble upon a design flaw in this method of laying a life line...


See that hair elastic I used as a stitch marker? It's now knit INTO the life line and I had to cut it off to continue to knit. In general, this is a non-issue for me as I always use locking stitch markers. Yes, after years of knitting I still repeatedly knit my markers into my work. This would probably happen less if I would refrain from knitting while A) over-tired, B) drinking wine, C) reading on my Nook at the same time, D) more than one of the above or E) all of the above. But what fun would that be.

Anywho, if you are someone who uses fancy gorgeous not-locking stitch markers, this is something you need to know about before hand. 

So basically, yes, I love these needles. While I *need* lifelines (cognitive/memory issues wreak havoc with complicated knitting ... as does wine ... and reading...) I'm too lazy to use them. I will definitely use this feature on these needles in the future to save my sanity. I can absolutely say without a doubt that I will never knit another laceweight project on them, but I can see myself knitting a row onto these needles just to lay the life line and then knit them back onto my preferred lace weight needles. 

I do love them, I'm happy I bought them and really enjoy knitting with them despite the cons. As I've mentioned in other articles, every interchangeable set has it's pros and cons. How much they please or bother you is completely personal and tough to predict. I'm very lucky to have an online yarn craft group to go to about things like this. I love you people <3

Thursday, May 10, 2012

Ego and the Art of ...

I've spent  a great deal of my life with a "Hey, look at me!" drive somehow lodged in my brain. For the life of me, I can't figure out where it came from - my parents gave me plenty of support, praise and attention but I still always craved being different, elite ... noticed.

In early life through college I tried to find satisfaction in this through many paths - ballroom dancing, judo, acting, yoga, basketball, choosing a unique major ... singing. Some people on driven paths just have fun with their art. Others challenge themselves with personal goals or strive to make a career using their craft . Some lonely few are just trying to fill that young need to stand out, be praised.

Look how _______  I am!
Flexible
Talented
Compassionate
Resilient
Different
Crunchy
Strong
Brave
Intelligent
Powerful

Some people know I get injured easily in yoga because I have poor proprioception , meaning my brain doesn't interpret signs from my connective tissue and muscles well. You know that feeling that says "WHOOOOOOAA baby, slow down"?People with poor proprioception don't hear that voice soon enough ... if they hear it at all. Well, I have a dirty secret: the other reason I got hurt frequently in the first decade or so of my practice. Most of my practice. Almost all of my practice.

Ego.

"I've been practicing for years, I can do the advanced variation. I don't need no stinkin block. Can the teacher see me?"

Sigh.

It can be nauseating to face such a shallow, vulnerable, reaching part of oneself and think, "Why can I not let this go?" When I closed my business and stepped away from the babywearing community, I lost more than I outwardly expressed. Yes, it was income, it was a business I loved and enjoyed, it was my tribe ... but it was also Ego. I was a known name in the babywearing community (for better or for worse) and I felt like I went from being Someone to being invisible.

Recently after two years of web-based home yoga practice through YogaGlo ("Who needs a level one class? This level three can't be too ... ow!) I began an amazing Gentle Yoga class at our local YMCA. The teacher's wry sense of humor and deliberate positioning of her mat (putting the students' backs to the mirror) began to quicken that slow-to-develop part of me. Rather than striving to be the best, to get attention, I was led inward. Apparently the path to letting go of the Ego was to let go of letting go?

The relaxation (not to mention lack of injury) engendered by this absence of internal conflict translated to my muscles as well as to my heart and mind. I began reaching with joy and contentment in my poses, relishing the release as opposed to straining for some unreasonable goal.

Ironically, the day after I realized this shift, my teacher drew the classes attention to the form of my pose with a lovely compliment. I thought about it on the way home, concerned at how my Ego would handle this ... in the past this would have spiked my excitement, distracting me from the class and prompting me to focus on the outward instead of the inward. She brought it up again at the next class - this time her flattery giving me warm fuzzies and slight embarrassment instead of my usual giddiness.

I pondered.

A wise Guru in the tradition of Aghor Yoga, Baba Harihar Ramji of Sonoma Ashram, spoke to me once in darshan. A personal interaction with a Guru, darshan can be anything from a time to speak in private to a blessing to a hug to a simple touch . He reminded me of the importance of detaching oneself from things that draw upon our energy. Detach our energy from the situation, step back and decide how, if at all, to better contribute our energy to the situation. In satsang (a lesson or teaching time, generally in a group), Babaji extended this metaphor to thoughts intruding on our yoga practice. Detach your energy from the thought, acknowledge the thought and allow it to flow by, no longer held by our attention to it.

I realized I had done the same thing with Ego. Encouraged by the manner and teachings of my instructor, I naturally detached myself from my Ego. I stopped trying to force it into submission; I stopped feeding it with striving for more praise. I just stepped back. I slid so easily, effortlessly into this state of mind that when complimented I stayed detached ... watching my ego cherish the compliment but not giving it any energy ... and then moving on.

It has been years from since my day with Babaji and I'm quite certain my yoga teacher never put "change Melissa's existence" into her daily plan. Yet here it is, a shift that has led to my increased relaxation and enjoyment of my yoga practice. How else will this small drop ripple my pond?


**I am in no way connected or receive reimbursement/product/kickbacks/magic powers from any of the companies mentioned here. All products or services mentioned were purchased by me.**

Tuesday, April 17, 2012

How to Buy Interchangeable Knitting Needles

It has been over a year since I wrote a blog post about my fancy shiny new set of Addi Lace Click interchangeable knitting needles. In that time I've done a ton of knitting and a fair amount of research on interchangeable sets so I decided it was time to put my thoughts down in one place for folks looking to purchase interchangeable needle sets. This article is not going to tell you what to buy but it will tell you what to think about before you purchase. Interchangeable crochet hook sets are also available but I crochet about as well as I water ski.

Keep in mind that you can also create your own needle sets by buying the cables and tips individually. The information below can be useful to help you decide whether a full set is right for you.

An interchangeable needle set consists of  multiple size needle tips that you can connect to separate cables to create circular needles. Most sets come with a variety of cable lengths. Other accessories available for purchase or included in some sets are cable connectors (to join more than one cable together to make a longer cable), stops (if you want to take the tips off a work in progress and leave them on the cable, you can screw a stop onto the end of the cable, keeping the live stitches from falling off), storage cases and cables or tips of additional sizes. For the purposes of this article, "Needle tip" refers to the part of the interchangeable set that you join onto a cable and "needle point" refers to the tapered end to the needle tip that is inserted into live stitch. "Join" refers to the mechanism that connects the tip to the cable.

Interchangeable sets, while cool, are not the right choice for everyone. Some reasons you might make the investment are...

  • You are tired of digging through piles of circular needles for the right size/length and then not having what you need
  • You want to shrink the physical space your needle collection uses (after all, then you have room for more yarn
  • You know what you like in circular needles and want a lot of it
  • You frequently under/over-estimate the cable length you need for a project and find yourself having to switch needles while knitting. And it irks you.
New knitters may be tempted by the simplicity of buying a needle set rather than individual fixed circs. Let's face it - needle sets are way cool. I won't tell anyone not to buy a needle set but reading through this article will help you make that decision.

Material
Folks new to knitting will find that there are as many types of knitting needles as there are knitter. Needles can be found in a variety of materials. Some of the most common are metal, plastic/acrylic, bamboo and wood. No needle material is better than the other, honestly. In a pinch, any needle will do but most knitters have preferences that they develop over time. Many knitters (especially beginners) like a smooth but not slick surface, or even surfaces with a little bit of drag to reduce needles-slipping-out-hysterical-panic situations. Other knitters like their needles as slick as possible to increase their speed. Aside from surface and finish, different materials just FEEL different in your hands. Some knitters love the way wood warms to their touch and gives ever so slightly while some like the cool, light-weight firmness of metal. This is something you need to experiment with before investing in a needle set. Higher end companies like Lantern Moon and others also produce beautiful rosewood and ebony interchangeable sets.

Now that you've thought about your materials you've narrowed down your selection a bit. If you are interested in more than one material even after testing fixed circular needles but definitely want a set, you have two ways to go. You can create your own set by buying individual tips or you can choose your favorite material from a manufacturer that offers sets made of multiple materials. For example, you could buy the complete metal set you love from a manufacturer that also makes the bamboo you adore. In time you can add the bamboo tips to your collection and use them with the cables from your metal set. Knitpicks, Skacel and Knitter's Pride all offer multiple needle materials - I'm sure there are others as well! If you are going to try this route, test out fixed circs in both materials before buying a complete set.

Now let's get into the real particulars. These don't matter to every knitter but if you find yourself special-ordering your needles online because you can't stand X or Y about the needles available in your local stores, then you should consider what you like and dislike about the needles you use.

Tip Length
A first deciding feature among interchangeable needle sets is length of the needle tip. This relates directly to the comfort of knitting as well as to the complete needle length you are able to make with the cable. Most interchangeable needle tips range from 4.5" to 5" in order to be comfortable in the hand to most knitters. The downside of this length tip is that the shortest complete needle length yo can make is (usually) 24".

The knitters who have an issue with this are people who do the majority of their knitting on 16" or 20" needles. If this is your game, consider Addi Click Lace needles by Skacel. With 3.25" tips, they are specifically designed for smaller circumference knitting and come with cables that will join to make 16" and 20" complete needles. For folks unused to the short tip length of shorter cable needles, consider that many folks complain of hand pain from this tip of needle.

Joins
As I mentioned above "join" refers to the mechanism that connects the tip to the cable. This usually a screw on or locking mechanism. Some screw-on mechanisms come with a tightening tool - use it Every Dang Time. I'm not kidding. Even if you tighten them as tight as you can by hand, your cable can come unscrewed. Want to know the fun part? If your cable comes unscrewed while you are watching TV or otherwise distracted, you might not notice and keep knitting ... dropping your whole row. Keep in mind that this won't happen if you use the tool like you are supposed to. Don't let that scare you off ... one of my favorite sets of needles have a join like this. On the other hand, if you know that will irk you, seriously consider not buying a set that uses a tightening tool as part of the join.

Locking mechanism joins don't require a tightening tool. They remind me a bit of the locking join that connects the detachable mixing blade on a Kitchen Aide stand mixer. As long as you attach them properly, they stay tight. So why would anyone buy a set that comes with a tightening tool? The locking mechanism join is only found on certain needle sets. If those needles don't have the other features you want, you need to consider what your top priorities are.

Sharpness and Taper of Needle Point 


This is a fabulous comparison shot of needle tapers and sharpness as an example of how tips can vary(photo credit: Jillian Mellen). For some knitters, a needle is a needle. Nuff said. For others however, the right tip really matters. For those needle geeks out there who focus on the minutiae (waving my hand over here), this is an important part of choosing a set. I don't have comparison shots of all the tips out there but take a look at the variation within just these two brands...

These are all size 5/3.75mm needles. From the top:
Skacel Addi Lace (fixed circ shown - Addi lace interchangeable needles are made with the same point shown above but with a different finish than pictured)
Skacel Addi Turbo
Dyakcraft Darn Pretty Metal (Mountain Mist)
Dyakcraft Darn Pretty wood regular
Dyakcraft Darn Pretty Lace
The Long and Short of It
Before buying an interchangeable needle set, I highly recommend buying a fixed set of needles in the material/tip style/tip length you are considering and knitting a WHOLE project on them. Knitting a test swatch in the store is simply not going to give you the data you need to make an educated investment when choosing between sets. While you can easily resell an interchangeable needle set, keep in mind that many other people might dislike the same features you do ... leading you to take a loss in reselling (ask me how I know). While this won't give you information on how you like the join of a particular set, it will help you decide on other features. There is no perfect set, no best set out there ... but with some research you can hopefully find the best set for you.


**I am in no way connected or receive reimbursement/product/kickbacks/magic powers from any of the companies mentioned here. All products mentioned were purchased by me or by the fabulous chiquita who shared her pic, generally using standard shipping which I immediately regretted as it takes too flipping long.**

Monday, March 19, 2012

Mexican-Inspired Stuffed Shells

The children are quietly eating now as I type. Quietly. Eating. (*pausing for dramatic effect*)

I know.

At the market this Sunday, Audrey asked that we buy large pasta shells. Considering she abhors Italian red sauce as well as stuffed pasta of any kind, I was momentarily flummoxed ... until I remembered Pinterest. For the uninitiated, Pinterest is basically a virtual cork board. When you find a recipe/web picture/article you want to save, you create a Board and "pin" it on there. The difference between this and a browser bookmark list is that Pinterest shows you your "pins" as thumbnails, playing on the consumer's visual memory.

Over a month ago I had pinned a recipe for Taco Stuffed Shells. I asked Audrey if she thought she would eat those and tossed the shells in the cart when she nodded. Oooooooook. I didn't expect Maddie to eat the results - she hates chicken, salsa, mixed ingredients ... somebody stop me.

I took to pinterest and, oddly enough, quickly discarded the recipe I'd pinned. After researching a few more recipes, I realized I would need to create my own. Most of the recipes I found used cream cheese to mimic the texture of a traditional Italian stuffed shell. That would never fly with my sensory kiddo, so took the yummiest recipe I could find, halved it (it made A LOT) , tweaked the ingredients and some of the proportions and went from there. If you like a more creamy, traditionally textured stuffed shell, check out the original recipe here on Busy-at-Home.

And the small people are inhaling them.


I know.

Mexican-Inspired Stuffed Shells
2 cups diced or shredded cooked chicken (I used diced rotisserie)
1 can rinsed black beans
4 scallions, chopped
1/2 tsp cumin
1/2tsp Chili con carne seasoning (or chili powder, your own substitute)
1 cup diced bell pepper (your favorite color)
2-3 cups cheddar or similar shredded cheese

1-2 cups salsa/picante sauce/taco sauce (spiciness will increase with cooking ... choose your level of spice wisely)

1 box large pasta shells
2 tbl oil


Mix first six ingredients together in a large bowl. Add one cup of the shredded cheese and blend. This mixture as it is now can also be used to top nachos, fill burritos or just eat on it's own as a cold chicken salad.


Prepare a large baking dish for the shells by spreading the bottom with your salsa/etc.

Boil a large pot of water and add your oil - this will help your cooled shells not stick together before filling. Cook shells al dente (still firm) or they will be difficult to stand up for filling. Drain and rinse with cool water.

One at a time, hold a cool shell in your hand and scoop in some of the chicken mixture. I found an ice cream scoop like this one made quick work of the task. Each shell held just shy of one scoop. Set the filled shell open-side up on the salsa in the pan. My pan fit twenty Barilla shells, which is perfect for one meal at my house. Big eaters may want to double the recipe above and make two pans. Or more. Repeat this process until you have filled all the shells. . Sprinkle the remaining cheese on top. Cover it with as much as you need to make you weep with cheese goodness. I have no cheese left now, but that's not your problem. Unless you live nearby and deliver cheese...

Preheat oven to 350F degrees. Cover and cook for 20-30 minutes. If you have made this ahead and refrigerated it prior to, place pan in cold oven before turning it on. This will allow the pan to warm up gradually and reduce the risk of exploding glass pans. Because then you will be out a pan AND all that cheesy goodness. Whimper.

Since everything is cooked in this dish, you are just heating through so you can play fast and loose with the heating times as you wish. I had kids in the shower and kept it cooking longer than I planned but it still turned out fantastic.This recipe also made about two cups more filling than I needed to fill twenty shells ... which will be gone by tomorrow night since the kids keep asking for bowls of it.

This dish doesn't need any additional grains/starches and is well accompanied by cold raw veggies or a crisp salad.


**I am in no way connected or receive reimbursement/product/kickbacks/magic powers from any of the companies mentioned here. All products mentioned were purchased by me, generally using standard shipping which I immediately regretted as it takes too flipping long.**

Tuesday, March 13, 2012

Goodnight, Pit Crew

Goodnight Pit Crew
Goodnight farts.
Goodnight sweet friends, wherever you are
Goodnight Ella and Lulu too
Good night Julie, we all love you
Goodnight Bruce, the man in the moon
Good night sweet fighter, we'll meet again soon.
Goodnight writers
Goodnight grievers
Goodnight rainbow-pooping, unicorn-riding beavers.

Goodnight to the pray-ers,
The dancers, the weak
Goodnight to the peaceful,
The angry, the meek
Goodnight ninjas and He-Man vids
Hold close your lovers, kiss hard your sweet kids.

Live every minute, laugh hard and grin
Don't wait every day for good times to begin.
Find joy in your world not dwell in the pain
Eat ice cream for breakfast, let Bruce live again.


to learn more about the Rosenburgs (or just to understand about the farts and rainbows)...

Rock Hill man’s death from cancer – surrounded by love
Ice Cream for Breakfast
What a Babywearer is (Find your Tribe) 
CaringBridge - Bruce and Julie Rosenburg

How to help...
Cancerpalooza Fundraiser at Zazzle
Girasol Exclusive Avalon Rainbow Wrap-style Babycarrier Fundraiser (US)
Girasol Exclusive Avalon Rainbow Wrap-style Babycarrier Fundraiser (UK) 
Blankets, Podegi and Ringslings made from Avalon Rainbow
Ed Spargo CD Fundraiser for the Rosenburgs (jazz CDs - 100% of proceeds direct to them)
(The Spargos' link also contains paypal info for sending a donation directly to the family)


Read more here: http://www.heraldonline.com/2012/03/13/3817517/rock-hill-mans-death-from-cancer.html#storylink=cpy


Monday, March 12, 2012

Peace, my friend...

Today (and many other days) I'm proud to be a Babywearer. Take a second, hop over here and see what that really means. It's not just about using a sling ...  Finding Your Tribe

Divorce~Bankruptcy~Death~Birth~Infertility~Bedrest~Floods~Abuse~Surgery~Forclosure~Disability~Job Loss~Adoption~Drug Abuse

My friends, my Babywearers have had each other's backs for all of these. No, not in a "type in a forum" sense. In a fundraising, sending clothes, providing legal resources, middle of the night phone call sense.

Today we lift up one of our own, Bruce C Rosenberg, Lord of the Slings as he takes his Victory Lap. Bruce, you will always be A Babywearer.

Om. Om. Om.
Lokah samastah sukhino bhavantu

may all the beings in all the worlds be happy, healthy and free from pain

Om nama shivaya

I love you Rosenburgs

Wednesday, March 7, 2012

Spring on Four Wheels

Today my children played outside in the glorious 63F weather, enjoying the late snow before it all vanishes. Birds were singing, daffodils were sprouting and in one little corner of New England bunnies were coming out of their winter burrows...


Small children were pointing, neighbors were grinning ... all is well with the world.

Forget your troubles, come on get happy, People. Spring is on its way :)

Tuesday, March 6, 2012

The Nonnie Blanket

This past fall was a tough one for me. Serious fibromyalgia flares are always hard but this one came on the heels of my strongest 18 months in over a decade. I'd enjoyed exercising again and my body had forgotten what true fibro pain and fatigue felt like. As my brain turned to mush and my fingers went fumbly I groped for a knitting project to help me pass the time. Heaven knows I didn't dare attempt to finish my lace or sock projects so I decided to begin a small afghan as a surprise for each of my little girls.

Never having knit something as large as an afghan, I soon became a bit overwhelmed by the immensity of the projects ahead of me. There was one clear driving force that kept me moving forward however ... The Nonnie Blanket.


My grandmother, Irene, spent decades crocheting afghans and throw blankets for the people she loves. One of my favorite childhood memories is nap time on our scratchy green couch. When my sister and I were little our nap schedules were completely opposite (despite my mother's desperate attempts to synchronise them). During my sister's nap time, my mom would turn on a quiet show for me to watch while she and my sister slept. We three curled up together on on the old green sofa in the den, under a very 70's afghan made by my Gramma. Years later when I had children of my own it somehow wandered into my apartment and I will Never. Let. It. Go.


At some point my Gramma managed to make three of beautiful cream blankets - one for myself, my brother and my sister. I can't imagine making knitting three of the same blanket -let alone one as complex as this. She'll tell it's a simple pattern and no big deal but now that I have a clue about what goes into these, I'm just floored. I love the classic beauty of this one.


I'd really love to have this blanket out in use but I just can't bear the idea of little fingers poking through the holes or leave an uncapped marker on it (shudder!) so it's hanging out at my mother's house until I can welcome it home. I can just picture it draped over the back of the rocker glider that I nursed my babies in.


My Gramma just kept on crocheting. I was thrilled to receive this one at my bridal shower and it moved with my husband and I from our first apartment to our condo. Whenever I was sick or just feeling blah I began to reach for its familiar comfort. I snuggled under it through pregnancies and newborn days and eventually it gained permanent residence on my side of the bed. When my oldest daughter began to talk, my Gramma became Nonnie and this blanket became The Nonnie Blanket. When the children were sick or frightened at night they would ask to borrow it, fighting over it until I brought out the green and brown one ... now dubbed The Other Nonnie Blanket.


And then we were all sick at once ... leaving no Nonnie Blanket for me. So I began to knit...


I wanted these to be surprises so every time the girls asked me what I was knitting I told them they were shawls - for me. Maddie actually helped me choose the colors of yarn without realizing what it would be for. The acrylic yarn was hard on my hands but it feels soft and squishy to the touch. I usually knit with some variety of wool but I wanted these to be working blankets, to be dragged around, loved up and most of all, machine washable. 

Maddie sleeps under hers every night and Audrey keeps hers by her pillow so she can reach out and hold a corner if she needs it. 

Maddie asked me to write that she likes snuggling under it because she loves it so much. When I gave these to each girl, I told them that each blanket was over 17,000 stitches and that each stitch was full of love. I always appreciated Nonnie's afghans but never knew how much time and love went into each one until I made my own.

Myself, Nonnie holding newborn Maddie, Gramma Baker and The Nonnie Blanket

Grandpa Jack and Nonnie


I love you Nonnie!


Monday, March 5, 2012

Something that got me out of bed the other night...


I Walked

I walked. I walked.
Boundless countless steps.
Ancient roads, dripping jungles, slushy sidewalks.
Wearing  laughing babies, picking berries.
Temple stairs cut into rock,  slippery tile in city subways.
Moving in three hundred sixty degrees.

Pain and change and time.
Steps crumble, freedom leaves my grasp.
Slowly slowly I coax their return.
Widening my circles, never as grand but so  precious.

Carefully tended steps evolve
Revealing now their  shape, texture.
Wander. Struggle. Galivant.
Stray. Trudge. Cruise.
Lean hard on a cane, count the steps home.
Stride fiercely across glowing coals.
Dance.

Each step chants a prayer of beauty, peace
Thankfulness, freedom

Intend every step, own every  movement.
Nevermore just walk.

Melissa Gentile 2012


Please do not re-post without crediting me

Wednesday, February 22, 2012

It's time for a POLL!

... because I'm a Libra and can't make up my own mind.

So I have a silly cute little car. It's a vaguely obnoxious blue, which makes it super easy to find in a parking lot. It attracts small boys ("oooooooh Mommy, I want a blue car like THAT) and makes me think twice before flipping off people in town since everyone knows it's mine. I've had many people say that it's completely totally Me ... which does make me wonder why people identify me with a tiny startlingly blue station wagon.

My pretty car:


I stumbled on these COMPLETELY AWESOME car accessories on Amazon and bought them immediately. Don't they just beg, whimper and plead to be on my pretty car?
That's right. I bought an Easter bunny costume for my car. So much awesomeness.

Anyway, when do YOU think I can reasonably put these on my car? I'm one of those people who  seriously hates Christmas decorations showing up in the stores before Thanksgiving but I'm having trouble waiting here. So vote in the poll above and share it with your friends. I need all the help I can get.


**I am in no way connected or receive reimbursement/product/kickbacks/magic powers from any of the companies mentioned here. All products mentioned were purchased by me, generally using standard shipping which I immediately regretted as it takes too flipping long.**

Friday, February 10, 2012

Crockpot Pulled Barbecue Sandwiches with Homemade Sauce

Before I start, I just want to add the disclaimer that there is no accounting for taste ... and barbecue sauce is no exception. This sauce worked happily for us and was much better than bottled but is nothing like some of the regional sauces I've had in the south. While I prefer this to the vinegary or mustardy versions found in some areas, your mileage may vary.

This sauce recipe is based on the America's Test Kitchen Family Cookbook Barbecue recipe. I altered it slightly based on our own tastes, the contents of my pantry and the fact that it was going to be dumped, for better or for worse, into my little 2.5 quart slowcooker. This meant reducing the liquid slightly initially in case the recipe was too watery. It's easier to add fluid to a crockpot than it is to reduce it down. This also mean eliminating a few steps in the recipe that were done on the stove top.

The other problem I wanted to conquer was how to avoid the floaty fat bits found scumming up the top of crockpot-cooked meat. If you don't know what I am talking about you are either a better cook than I or darn lucky. They tend to be worse if using cold meat (which I was) so I wanted to try to find a way to prevent the nasty stuff. Oh I know I can skim but it irks me. Notes on this after the recipe.

While this has chili powder, hot sauce and cayenne pepper in it, know that it is in relatively small amounts and we didn't notice any heat. Feel free to reduce amounts if needed but the sauce will lose some depth.

Pulled Barbecue Sandwiches
2lbs meat - I used 1 lb beef (I just used a random tough cut of meat I had in the freezer from a sale) and 1 lb boneless chicken breasts.

Sauce
1 tbl coconut oil (use whatever)
1 onion minced
2 garlic cloves minced (more or less, as you like)
1 tsp chili powder (I used 1/2 tsp chili powder and 1/2tsp Penzey's Chili con Carne seasoning - it's salt and natural smoke flavor free without too much heat)
1/4 tsp cayenne pepper
3/4c ketchup
3 tbl light or dark molasses
1 tbl apple cider vinegar
1 tbl tamari or soy sauce (original recipe calls for Worcestershire sauce but I hate it - the tamari was a good touch)
1 tsp hot sauce (original recipe calls for Tabasco, I used Cholula)
Optional Dijon mustard, salt & pepper (*See noted below)

1 bottle of beer or 1-2 cups additional liquid (water, stock etc)

Rolls as needed.

Turn slowcooker on high and add oil, onions, garlic, chili and cayenne pepper. Stir well to blend, cover and allow heat for until fragrant. Add all the remaining sauce ingredients except beer. Mix well. Dump in meat. Cook on high for 3 hrs. After 3 hrs, stir well and reduce to low. If sauce is too thick add 1/4c of liquid at a time. Leave on low at least one hour but longer if needed. Add more liquid as needed. To serve pull meat apart using two forks and spoon onto rolls. Nom nom nom.

* Um. Original recipe called for salt, pepper and Dijon Mustard ... I missed those. I think black pepper to taste would be ok. The soy sauce etc are already fairly salty so I can't see needing to add salt. If you want to add the Dijon, add 1tbl.

Defloatying the Meat
I think you've picked up on my distaste for the floaty bits. This process will dry out meat but for a recipe like this, that's a total non-issue. Trim any obvious fat off before starting this process. Again, your mileage may vary but I will definitely take time to do this again. I almost always have plenty of energy when I prepare the crockpot but very little when I am ready to serve.  It's really important to me to be able to serve whatever is in there without having to pretty it up.

While your slowcooker is heating the onions et al, preheated a large skillet (use whatever you would use for browning meat) to somewhere just shy of medium. Place your choice of meat in the pan, slowly warming it through, cooking the outside but not browning it. As the outside of the meat cooks, the floaty bits will ooze out. Scrape them off and make em go away. A good deal of liquid will come out but there will be plenty in the crock - let it cook off. Keep the heat low enough that the meat sizzles but not so high that it browns. Flip occasionally. As they stop releasing liquid, press pieces occasionally, continuing to scrape off any white fatty bits. When they have released most of their liquid, transfer to the crock pot. And you're good to go.

Thursday, February 2, 2012

Baby Books

My mom has a box somewhere with a beautiful Baby Book she made for me. I've even scrap-booked myself, making an album for my sister as a maid-of-honor gift.

Yet my kiddos have nothing.

I have boxes of little saved things and for my eldest, a calender with notes on it about many special little things. And if you gave me a few days I could probably find them. I think. I know I have a whole mess of photos and a bunch of little videos ... I even have some blog posts (ahahahahaha). At least we all know my babywearing life is well documented. But they don't have baby books. I was busy with my home business, they were challenging little bundles of joy and life took us down a few years of bumpy roads that made just remembering to wear pants a victory.

I journalled through all of my adolescence and young adult years. Sometimes I did it with a fancy fountain pen ... I even used a dip pen and India ink for a time in college. Somewhere in our attic is a wooden wine box completely filled with pages and pages of angst. Oddly enough, when I met my husband I stopped journalling. I tried but, well, I was happy. There WAS no angst to document and I could only wax poetic on our blossoming romance for so many pages.

I was at Target this week with my mother and a very impatient five year old and I thought it would be fun to start keeping track of the goofy stuff they say/do by writing down little tidbits on index cards and storing them in a cute little box. Target had no boxes but they had really lovely journals ... and I realized I had something to write about again.

So tonight I started books for the girls and contentedly tucked them next to the computer. And I'm happy :)

Tuesday, January 10, 2012

Loose tea. Tame that bad girl.

Long story short: I heart tea. If you've been following along you may have read some of my previous posts on tea and you may well be sick of the subject. So sorry, mea culpa.

Now for the rest of y'all.

I talk a lot about loose leaf tea. Why bother? I'm sure there are many erudite reasons for loose vs tea bags. Come on, you know how to google. Yes, I do use loose leaf tea because I find the taste more full, more fresh but for me it also feels ... serene, peaceful, elegant, sensual, exciting. I wipe noses and say things like "STOP LICKING ME!!" all day long (and often at night) so you can see why a little cup of grace might be attractive.

Like my last post, this is just my opinions and your mileage may vary.

So when you make loose tea, you basically need something to boil the water, something to steep the tea in and something to strain out the leaves. I'm going to talk about some of the things you can use for each step, from basic things you may have around your house to fancy expensive doo-dads. I'll point out what I use myself and why and what I don't. And so ... away we go.

Boiling

Duh.You can use a pot. Any old pot or pan'll do but if you want to be specific, one with a pouring lip is better. Another simple thing to use to boil water is a microwave - fast, simple and if you have a good sized microwavable measuring cup, it makes pouring darn easy.

Some other options are a tea kettle (ye olde whistling kind or not) or an instant coffee machine like a Keurig.

Here is my pretty kettle/teapot ...

Here is why I love it. It's excellent for both boiling and steeping and it holds a whole lot. And it's vintage and purty and makes me smile. Most folks don't make enough tea to need something like this but I tend to make a pot and drink it all day so this rocks.

Steeping
You can pretty much steep your tea where you please - in a mug, teapot, or some fancy gadget that has a built in steep mechanism (more on that later).

I steep my tea in that pot above (see why I love it?), a smaller tea pot, or  a mug with a strainer in place. If you are someone who only makes a cup, a teapot is total overkill but if you regularly make cup after cup, consider getting a pot appropriate to the size you want to drink. While many folks get ornate cast iron post now popular everywhere from tea boutiques to Target, think about how heavy they are PLUS the added weight of a quart of water. 

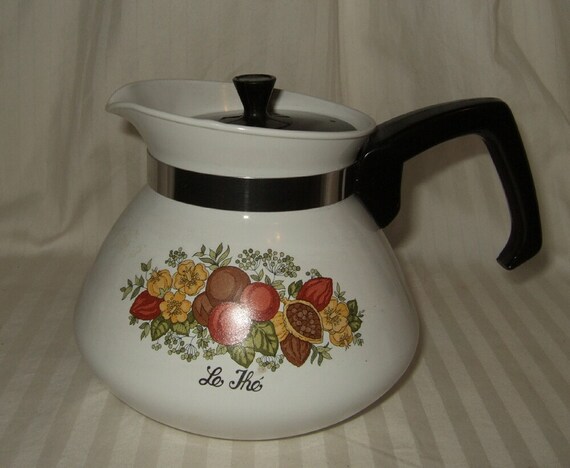
I found my vintage Corelle pot on Etsy but there are hundreds on eBay. They are lightweight, very affordable and boil quickly.

My smaller pot is the Dripless Teapot from Teaspot.com They now have a newer model called the Mod Pot with a special basket that fits it better than the Tuffy Steeper but I'm pretty sure the design is the same.

This pot holds 20oz and was fine for me alone but not enough for me to pour for myself and two girls. It really is a dripless pot and that is truly awesome.


Straining
This is were new loose tea aficionados often get cranky. They buy a lovely bag of loose tea and a pretty tea ball or a clampy style weird strainer thingy. Maybe a pretty strainer they can set on top - you've seen them. They follow the directions, measure out their tea and wait with bated breath... and then they proceed to pick the tea leaves out of their teeth.

So what can you do on the cheap at home? Well for one, don't try to use a coffee filter. Trust me. Mess. Burns. You get the idea. If you have a small mesh strainer, go for it but be aware that it may let some tea through. 

Stay away from those tea balls on chains, etc etc ... they just don't work and are often hard to clean. There are disposable choices and reusable choices. Touching on disposable briefly, you can get paper tea bags you can fill yourself but they aren't cost effective if you will be using them often. Other similar options are muslin bags that you can reuse for a while but these also do not last forever. If you want to be crafty, sew your a bunch of own and put a wee drawstring at the top - any white cotton cloth will work fine.


One of my steepers is The People's Brew Basket made by the Republic of Tea.  This is an affordable, effective steeper with super fine mesh (filters out most of the finest particles of your blend). The one I have is about 15 years old and still working fine. It cleans best if you rinse it out when the tea is wet. The only downside is that it can be too small for some pot openings, and sinks down below the lid in some of the very large mugs. I've actually set this inside some of my larger steepers when brewing a pot of rooibos tea, which tends to evade even the most challenging steeper.


Another one I love is this large Steeping Mug from The Tea Spot. The strainer is very good except for the fine rooibos teas. The strainer is slick and smooth, dishwasher safe. It cleans completely easily and rarely gets leftover tea stuck in the holes. My children killed my mug. I'm still in mourning. I still use the lovely strainer in regular mugs. The strainer is actually available separately but you need to call directly to get the link to order.


My last strainer just arrived today so of course I've already test-driven it. I'd been having trouble finding a deep steeper that would hang on the wide rim of my Corelle teapot. This large Finium Brewing Basket seems to fit the bill. I was impressed today how well the water flowed through the filter and was shocked that absolutely no rooibos got through into the brew. 


As I mentioned above, you can also get a gadget like this that steeps and strains as one unit. This is referred to as a gravity teapot. I've had these and they do produce a nice brew. You fill it with your loose tea and boiling water and when it's ready, you sit the gadget on top of your much and a catch releases so that the tea flows through the filter into your cup. It does do a lovely job. I found it really fiddly to clean (personally) which was a major turn off. 

The biggest downside to this device is that I make quite a bit of tea at once ... but what if I don't use the last 6 ounces? I can't leave it in the gravity pot because the leaves are in there. I found myself having to put that last bit into an extra mug or a mason jar and tuck it in the fridge. There was no easy way to keep that extra warm and it just buuuuuugged me. So while many people love this, it's design just doesn't work for me.

So now you have an idea of what you need! Here are some great links on tea that may help you on your road to the perfect cup.

Caffiene and Tea - Did you know how you brew your tea affects the caffiene level? 
How to Brew it. Really. - 3 minutes at 208F? What does that mean?? Read this article for realistic instructions.
What is a Tisane - Is your tea really a tea?
Types of Tea - With cool pictures
My kind of Chai - a few of my favorite spiced teas


**I am in no way connected or receive reimbursement/product/kickbacks/magic powers from any of the companies mentioned here. All products mentioned were purchased by me, generally using standard shipping which I immediately regretted as it takes too flipping long.**