My two year old niece, Beatrice Patrica (yes, she is often called by both names - she's a wily one) is ... verbal. At 18m if you asked her what she liked to eat, she'd tell you crudites. Seriously.
Bea speaks in a tiny quiet voice (her screams are a very different experience) so I find myself going very still to hear what she has to say ... it's always worth it. This week my sister was getting Bea ready for bed and telling her about a friend's "teeny tiny kittens". Beatrice began to chat, "... and the little tiny kittens were playing, and the Auntie Kitten was knitting a sweater..."
I love you, Bee-ah :)
Saturday, August 18, 2012


Monday, August 13, 2012
Rocking the freezer - single servings of chili
I have a picky kiddo that needs huge amounts of protein ... in small portions, many times throughout the day. Add in that I can't stand/cook for long periods of time or frequently during the day and that I can only shop about twice a month and it gets a bit challenging. Honestly, it's like a Parenting SAT question. Thankfully this kiddo loves homemade chili. A few months ago I stumbled on a great system for freezing perfect sized portions of chili so that I can just defrost enough for her.
Folks who know me understand that I'm very cautious about plastics and food storage. I tried freezing small portions in glass containers but I disliked the amount of freezer space they took for storage. They also were a bit awkward to defrost. So color me tickled when I stumbled on these in the plastic bag section of the market...

These are small, thin, plastic bags with no zipper. They are extremely economical, easy to remove food from and - my favorite - BPA-free.

I then added this to the equation ... my 2" cookie dough scoop. This handy little gadget is great for making large cookies but it's also fun for scooping rice or other foods. It holds about 1/4 cup so it's easy to gauge portion size if that matters to you.

So what did I do? I nestled the bottom of a bags into one cup of a muffin tin and then scooped two scoops into that cup and patted it down. I flattened the rest of the bag into the cup next to that one and made another little chili muffin. I gently patted the bag down so it wasn't too full of air pockets, twisted the bag and clipped it closed. I used these fancy little doohickeys I found at Ikea but regular twist-ties will work as well. Repeat for all the chili you have and then freeze until solid. When frozen, pop all the bags out of the muffin tin and store them in your preferred large freezer storage product (glass, freezer bag etc).
Half cup portions are perfect for a mildly hungry Audrey and if she's really starving I can thaw two instead. And a well fed Audrey is a happy Audrey :)
**I am in no way connected or receive reimbursement/product/kickbacks/magic powers from any of the companies mentioned here. All products mentioned were purchased by me or by the fabulous chiquita who shared her pic, generally using standard shipping which I immediately regretted as it takes too flipping long.**
Folks who know me understand that I'm very cautious about plastics and food storage. I tried freezing small portions in glass containers but I disliked the amount of freezer space they took for storage. They also were a bit awkward to defrost. So color me tickled when I stumbled on these in the plastic bag section of the market...
These are small, thin, plastic bags with no zipper. They are extremely economical, easy to remove food from and - my favorite - BPA-free.
I then added this to the equation ... my 2" cookie dough scoop. This handy little gadget is great for making large cookies but it's also fun for scooping rice or other foods. It holds about 1/4 cup so it's easy to gauge portion size if that matters to you.
So what did I do? I nestled the bottom of a bags into one cup of a muffin tin and then scooped two scoops into that cup and patted it down. I flattened the rest of the bag into the cup next to that one and made another little chili muffin. I gently patted the bag down so it wasn't too full of air pockets, twisted the bag and clipped it closed. I used these fancy little doohickeys I found at Ikea but regular twist-ties will work as well. Repeat for all the chili you have and then freeze until solid. When frozen, pop all the bags out of the muffin tin and store them in your preferred large freezer storage product (glass, freezer bag etc).
Half cup portions are perfect for a mildly hungry Audrey and if she's really starving I can thaw two instead. And a well fed Audrey is a happy Audrey :)
**I am in no way connected or receive reimbursement/product/kickbacks/magic powers from any of the companies mentioned here. All products mentioned were purchased by me or by the fabulous chiquita who shared her pic, generally using standard shipping which I immediately regretted as it takes too flipping long.**
Thursday, August 2, 2012
Letters to my Daughters
Dear Audrey,
Ah my love, it is hard to be different. You are smart and colorful and so incredibly soft inside. I remember you coming home from first grade having been teased about loving the colors chartreuse, vermilion, magenta and aquamarine. You get that from me, love. I remember being called Webster because I loved reading the dictionary. I watch you do these same things, missing the same social cues I missed (and still miss...) and I see a very fancy target painted on your sweet little back.
I see you dealing with bullying in many forms. I see you not understanding how to fit into a group at the playground, feeling left out because you can't figure out how to join in. I hope and pray you find a way to be strong without holding power over someone smaller, more fragile than you.
I have hope.
Not that you will fit in or be any different than you are, or that you will fit in or be any less sparkly than you were born to be. I have hope that you will find other hedgehogs like you. Prickly on the outside, soft and unique underneath. I have hope that the work parents and educators are doing towards changing the face of bullying continues. I hope that no matter who you turn out to be, who you love, how you love, that you will feel strong and confident in your choices and yourself.
I have hope that someday you will talk to your children and try to help them understand how when you were little people were still told who they could love. And I hope it will be so freakishly foreign to them and to you that you have difficulty explaining it all.
Dear Maddie,
You are a such an amazing, vibrant little girl. I see how you walk into a room and instantly have friends, how you find people who are left out and gently ease them into the play. I see your bright mind and hysterical sense of humor and love watching you throw yourself hard into everything you try. I can't wait to see you enjoy work and school in ways I never could. I see you confused by your sister's difficulty joining in, hurt by her prickles, worried for her pain.
My hope for you is that you learn to understand how she feels, how those who are different, excluded, marginalized ... prickly ... that sometimes they are not choosing their path. How sometimes prickles are something they are born with. I hope you find happiness in your strength and not let those who would try, hurt your huge, squishy amazing heart.
~~~
We as adults are spending so much time reading, learning and teaching about bullying. And tonight while I should have been sleeping, I had a thought. If my future teenage Audrey was forced by stronger, more powerful, scary girls to give up a boyfriend she cared about ... that would be bullying. We are giving her tools now in her young life to protect her against those Mean Girls that would belittle her and degrade her choices.
But how is that different than a powerful, scary group of adults telling a person they can't marry their gay lover? How can we claim to teach our children not to bully others when adults still bully adults?
I still have hope. I have hope that small groups of people will make a small difference in small communities. And that small groups will become larger. I have hope that my children will watch freedom and the elimination of social bullying change over their lifetime. I have hope that adults who find their lives fitting easily into the norm, like my Maddie, will find compassion and strength to support those who are less strong and who need advocates.
Ah my love, it is hard to be different. You are smart and colorful and so incredibly soft inside. I remember you coming home from first grade having been teased about loving the colors chartreuse, vermilion, magenta and aquamarine. You get that from me, love. I remember being called Webster because I loved reading the dictionary. I watch you do these same things, missing the same social cues I missed (and still miss...) and I see a very fancy target painted on your sweet little back.
I see you dealing with bullying in many forms. I see you not understanding how to fit into a group at the playground, feeling left out because you can't figure out how to join in. I hope and pray you find a way to be strong without holding power over someone smaller, more fragile than you.
I have hope.
Not that you will fit in or be any different than you are, or that you will fit in or be any less sparkly than you were born to be. I have hope that you will find other hedgehogs like you. Prickly on the outside, soft and unique underneath. I have hope that the work parents and educators are doing towards changing the face of bullying continues. I hope that no matter who you turn out to be, who you love, how you love, that you will feel strong and confident in your choices and yourself.
I have hope that someday you will talk to your children and try to help them understand how when you were little people were still told who they could love. And I hope it will be so freakishly foreign to them and to you that you have difficulty explaining it all.
Dear Maddie,
You are a such an amazing, vibrant little girl. I see how you walk into a room and instantly have friends, how you find people who are left out and gently ease them into the play. I see your bright mind and hysterical sense of humor and love watching you throw yourself hard into everything you try. I can't wait to see you enjoy work and school in ways I never could. I see you confused by your sister's difficulty joining in, hurt by her prickles, worried for her pain.
My hope for you is that you learn to understand how she feels, how those who are different, excluded, marginalized ... prickly ... that sometimes they are not choosing their path. How sometimes prickles are something they are born with. I hope you find happiness in your strength and not let those who would try, hurt your huge, squishy amazing heart.
~~~
We as adults are spending so much time reading, learning and teaching about bullying. And tonight while I should have been sleeping, I had a thought. If my future teenage Audrey was forced by stronger, more powerful, scary girls to give up a boyfriend she cared about ... that would be bullying. We are giving her tools now in her young life to protect her against those Mean Girls that would belittle her and degrade her choices.
But how is that different than a powerful, scary group of adults telling a person they can't marry their gay lover? How can we claim to teach our children not to bully others when adults still bully adults?
I still have hope. I have hope that small groups of people will make a small difference in small communities. And that small groups will become larger. I have hope that my children will watch freedom and the elimination of social bullying change over their lifetime. I have hope that adults who find their lives fitting easily into the norm, like my Maddie, will find compassion and strength to support those who are less strong and who need advocates.
Saturday, May 19, 2012
More on Addi Lace Clicks- Long tips & Life Line Feature!
So by now you've probably figured out that I am partial to interchangeable knitting needles. If you are wondering if interchangeable knitting needles are right for you, hop your pretty little heiny over here to read my post about How to Buy Interchangeable Knitting Needles.


One popular brand of knitting needles is Addi by Skacel. Back in November 2010, Skacel released their long-awaited Lace Interchangeable Knitting Needle set. What made it a "lace" set? The point of the needle was long and supah-sharp, perfect for grabbing teeny tiny stitches and flipping them through the acrobatics of lace knitting. I happened to be at Stitches East for a few pathetic hours the week they were released in the US ... so I snagged me a set. My online knitting cronies clambered for the scoop on the Lace Tip set so, for Jillian, I wrote this Addi Lace Click Review.
So it's been a year and a half now and I have a few updates.
On the original Lace Tip Set...
These needles are one of the few sets of interchangeables that allow for small circumference knitting. If you've ever used small circumference fixed circular needles, you know that the needles themselves have to be shorter to be able to get that small circumference. Addis Lace set comes with cables that when combined with their tips, will make both 16" and 20" needles. Addis was apparently trying to hit this niche market of small circ knitters at the same time as satisfying the lace tip lovers. Oooooooookay.
For those who love small circ needles, this set rocks. Unfortunately, I've met a number of people who complain of hand pain due to the shorter size. Despite this, I still reached for my Lace Set often. The sweater that was going on forever? Holy smokes, it flew on those needles. But they hurt. They hurt enough that I would often have to put down a project in frustration.
The other complaint I had was the join. It catches, man. Not a smooth join at all and with the wrong yarns, my knitting continually got hung up. So why the heck was I still reaching for them? Ultra sharp tips, and a surface that I just grooved on. I actually increased in speed with these needles ... and for a slow knitter, that's a very cool thing.
When Addi came out with their recent Long Lace Tip Set, I realized, Hm. This could make me very very happy. The original Lace Tip set sold quickly on eBay and Momma ordered herself the new long needles.
And so, on the Long Lace Tip Set...
Oh mama. The needles fit perfectly in my hands. My hand pain disappeared with the first use, completely shocking me. I was thrilled to be able to finish projects faster because I could KNIT MORE! Woot! I was slightly saddened that they weren't able to improve their join but in order to make the locking mechanism work, I think the current join is as good as it is going to get for the foreseeable future. So I found a situation in which this join completely pissed me off: real lace.
You'd think that a set with Lace Tips would find away to fix that join, but in actual practice, lace weight yarn simply can't skim over it. At all. I picked up a hibernating work in progress (see my Lime Rickey Summer Shawl project page over here) using Susan's Spinning Bunny Merino-Tussah Silk lace weight. This is an amazingly well plied yarn, soft but not draggy or splitty, on size 4 needles. In this old picture you can actually see that it's on a set of fixed Addi lace circs.
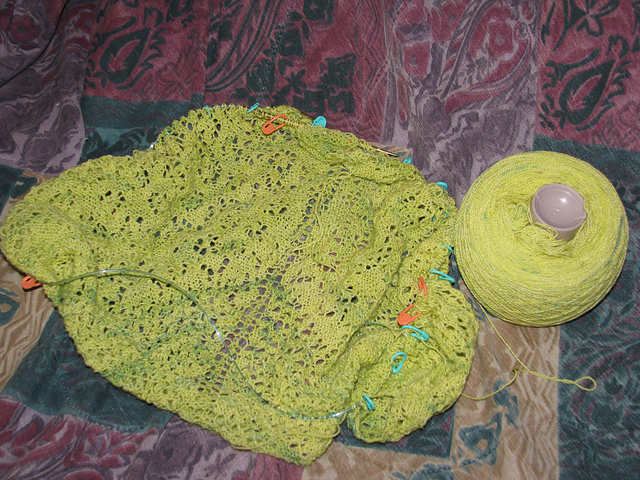
So the grand irritation of the Addi Lace tips - original or long - is that in my opinion they are completely useless with lace weight yarns. I'm sure that other people might not have this problem. I've only been knitting a few years and am definitely not as accomplished or coordinated as many of my friends so please take my opinion with a grain of salt. I will keep this set and use it very frequently, but not with laceweight.
The other fun feature of the new Long Lace Tip set is the Life Line feature. Never heard of a life line in knitting? Especially common in lace knitting, inserting a life line (a horizontal thread run throw an entire row of active stitches) lets you quickly rip back to a particular place in your knitting as opposed to tinking back stitch by stitch. Addi made a clever addition to the cables in the Long Lace Tip set by adding a teeny longitudinal slice to knitting cables. The idea is that you feed your life line material into that slit and simply knit as usual, with the life line being laid as you go. I've been told that waste lace weight yarn, embroidery floss and crochet thread are good choices for life line materials. I went for waxed mint dental floss, borrowed from my mom's medicine cabinet. Not the best choice, but hey, it'll do in a pinch. And my shawl is minty fresh.

This is a close up of the cable so you can see what the hoo-hah I'm talking about. It actually holds the life line material really well but threading it, well that is another matter. If you are going to use this feature, I reeeeeally recommend using one of these...

This picture is from How to Use a Needle Threader on About.com and if you've never used one I highly suggest you go over there and have an "Aha!" moment. I don't need them often, but needle threaders are fantastic tools for those really splitty threads that make the little vein in your temple throb.
Feeding dental floss through that little slit in the cable while trying to carefully pinch the cable in a way to keep the slit open.

So here is the dental floss life line in progress. You can see how the floss just feeds along with the stitches. I can honestly say that laying the life line itself was completely effortless.
The dental floss was not the best choice in life line material however...

See that snarl? That took me a half hour to tease out because if I pulled to hard, the thin plastic floss just stretched... and would snap. There was much cursing. Sigh.
Feeling very proud of myself, I decided to nail down a few more rows and take a lovely picture to share with y'all. And then I stumble upon a design flaw in this method of laying a life line...

See that hair elastic I used as a stitch marker? It's now knit INTO the life line and I had to cut it off to continue to knit. In general, this is a non-issue for me as I always use locking stitch markers. Yes, after years of knitting I still repeatedly knit my markers into my work. This would probably happen less if I would refrain from knitting while A) over-tired, B) drinking wine, C) reading on my Nook at the same time, D) more than one of the above or E) all of the above. But what fun would that be.
Anywho, if you are someone who uses fancy gorgeous not-locking stitch markers, this is something you need to know about before hand.
So basically, yes, I love these needles. While I *need* lifelines (cognitive/memory issues wreak havoc with complicated knitting ... as does wine ... and reading...) I'm too lazy to use them. I will definitely use this feature on these needles in the future to save my sanity. I can absolutely say without a doubt that I will never knit another laceweight project on them, but I can see myself knitting a row onto these needles just to lay the life line and then knit them back onto my preferred lace weight needles.
I do love them, I'm happy I bought them and really enjoy knitting with them despite the cons. As I've mentioned in other articles, every interchangeable set has it's pros and cons. How much they please or bother you is completely personal and tough to predict. I'm very lucky to have an online yarn craft group to go to about things like this. I love you people <3
Thursday, May 10, 2012
Ego and the Art of ...
I've spent a great deal of my life with a "Hey, look at me!" drive somehow lodged in my brain. For the life of me, I can't figure out where it came from - my parents gave me plenty of support, praise and attention but I still always craved being different, elite ... noticed.
In early life through college I tried to find satisfaction in this through many paths - ballroom dancing, judo, acting, yoga, basketball, choosing a unique major ... singing. Some people on driven paths just have fun with their art. Others challenge themselves with personal goals or strive to make a career using their craft . Some lonely few are just trying to fill that young need to stand out, be praised.
Look how _______ I am!
Flexible
Talented
Compassionate
Resilient
Different
Crunchy
Strong
Brave
Intelligent
Powerful
Some people know I get injured easily in yoga because I have poor proprioception , meaning my brain doesn't interpret signs from my connective tissue and muscles well. You know that feeling that says "WHOOOOOOAA baby, slow down"?People with poor proprioception don't hear that voice soon enough ... if they hear it at all. Well, I have a dirty secret: the other reason I got hurt frequently in the first decade or so of my practice. Most of my practice. Almost all of my practice.
Ego.
"I've been practicing for years, I can do the advanced variation. I don't need no stinkin block. Can the teacher see me?"
Sigh.
It can be nauseating to face such a shallow, vulnerable, reaching part of oneself and think, "Why can I not let this go?" When I closed my business and stepped away from the babywearing community, I lost more than I outwardly expressed. Yes, it was income, it was a business I loved and enjoyed, it was my tribe ... but it was also Ego. I was a known name in the babywearing community (for better or for worse) and I felt like I went from being Someone to being invisible.
Recently after two years of web-based home yoga practice through YogaGlo ("Who needs a level one class? This level three can't be too ... ow!) I began an amazing Gentle Yoga class at our local YMCA. The teacher's wry sense of humor and deliberate positioning of her mat (putting the students' backs to the mirror) began to quicken that slow-to-develop part of me. Rather than striving to be the best, to get attention, I was led inward. Apparently the path to letting go of the Ego was to let go of letting go?
The relaxation (not to mention lack of injury) engendered by this absence of internal conflict translated to my muscles as well as to my heart and mind. I began reaching with joy and contentment in my poses, relishing the release as opposed to straining for some unreasonable goal.
Ironically, the day after I realized this shift, my teacher drew the classes attention to the form of my pose with a lovely compliment. I thought about it on the way home, concerned at how my Ego would handle this ... in the past this would have spiked my excitement, distracting me from the class and prompting me to focus on the outward instead of the inward. She brought it up again at the next class - this time her flattery giving me warm fuzzies and slight embarrassment instead of my usual giddiness.
I pondered.
A wise Guru in the tradition of Aghor Yoga, Baba Harihar Ramji of Sonoma Ashram, spoke to me once in darshan. A personal interaction with a Guru, darshan can be anything from a time to speak in private to a blessing to a hug to a simple touch . He reminded me of the importance of detaching oneself from things that draw upon our energy. Detach our energy from the situation, step back and decide how, if at all, to better contribute our energy to the situation. In satsang (a lesson or teaching time, generally in a group), Babaji extended this metaphor to thoughts intruding on our yoga practice. Detach your energy from the thought, acknowledge the thought and allow it to flow by, no longer held by our attention to it.
I realized I had done the same thing with Ego. Encouraged by the manner and teachings of my instructor, I naturally detached myself from my Ego. I stopped trying to force it into submission; I stopped feeding it with striving for more praise. I just stepped back. I slid so easily, effortlessly into this state of mind that when complimented I stayed detached ... watching my ego cherish the compliment but not giving it any energy ... and then moving on.
It has been years from since my day with Babaji and I'm quite certain my yoga teacher never put "change Melissa's existence" into her daily plan. Yet here it is, a shift that has led to my increased relaxation and enjoyment of my yoga practice. How else will this small drop ripple my pond?
**I am in no way connected or receive reimbursement/product/kickbacks/magic powers from any of the companies mentioned here. All products or services mentioned were purchased by me.**
In early life through college I tried to find satisfaction in this through many paths - ballroom dancing, judo, acting, yoga, basketball, choosing a unique major ... singing. Some people on driven paths just have fun with their art. Others challenge themselves with personal goals or strive to make a career using their craft . Some lonely few are just trying to fill that young need to stand out, be praised.
Look how _______ I am!
Flexible
Talented
Compassionate
Resilient
Different
Crunchy
Strong
Brave
Intelligent
Powerful
Some people know I get injured easily in yoga because I have poor proprioception , meaning my brain doesn't interpret signs from my connective tissue and muscles well. You know that feeling that says "WHOOOOOOAA baby, slow down"?People with poor proprioception don't hear that voice soon enough ... if they hear it at all. Well, I have a dirty secret: the other reason I got hurt frequently in the first decade or so of my practice. Most of my practice. Almost all of my practice.
Ego.
"I've been practicing for years, I can do the advanced variation. I don't need no stinkin block. Can the teacher see me?"
Sigh.
It can be nauseating to face such a shallow, vulnerable, reaching part of oneself and think, "Why can I not let this go?" When I closed my business and stepped away from the babywearing community, I lost more than I outwardly expressed. Yes, it was income, it was a business I loved and enjoyed, it was my tribe ... but it was also Ego. I was a known name in the babywearing community (for better or for worse) and I felt like I went from being Someone to being invisible.
Recently after two years of web-based home yoga practice through YogaGlo ("Who needs a level one class? This level three can't be too ... ow!) I began an amazing Gentle Yoga class at our local YMCA. The teacher's wry sense of humor and deliberate positioning of her mat (putting the students' backs to the mirror) began to quicken that slow-to-develop part of me. Rather than striving to be the best, to get attention, I was led inward. Apparently the path to letting go of the Ego was to let go of letting go?
The relaxation (not to mention lack of injury) engendered by this absence of internal conflict translated to my muscles as well as to my heart and mind. I began reaching with joy and contentment in my poses, relishing the release as opposed to straining for some unreasonable goal.
Ironically, the day after I realized this shift, my teacher drew the classes attention to the form of my pose with a lovely compliment. I thought about it on the way home, concerned at how my Ego would handle this ... in the past this would have spiked my excitement, distracting me from the class and prompting me to focus on the outward instead of the inward. She brought it up again at the next class - this time her flattery giving me warm fuzzies and slight embarrassment instead of my usual giddiness.
I pondered.
A wise Guru in the tradition of Aghor Yoga, Baba Harihar Ramji of Sonoma Ashram, spoke to me once in darshan. A personal interaction with a Guru, darshan can be anything from a time to speak in private to a blessing to a hug to a simple touch . He reminded me of the importance of detaching oneself from things that draw upon our energy. Detach our energy from the situation, step back and decide how, if at all, to better contribute our energy to the situation. In satsang (a lesson or teaching time, generally in a group), Babaji extended this metaphor to thoughts intruding on our yoga practice. Detach your energy from the thought, acknowledge the thought and allow it to flow by, no longer held by our attention to it.
I realized I had done the same thing with Ego. Encouraged by the manner and teachings of my instructor, I naturally detached myself from my Ego. I stopped trying to force it into submission; I stopped feeding it with striving for more praise. I just stepped back. I slid so easily, effortlessly into this state of mind that when complimented I stayed detached ... watching my ego cherish the compliment but not giving it any energy ... and then moving on.
It has been years from since my day with Babaji and I'm quite certain my yoga teacher never put "change Melissa's existence" into her daily plan. Yet here it is, a shift that has led to my increased relaxation and enjoyment of my yoga practice. How else will this small drop ripple my pond?
**I am in no way connected or receive reimbursement/product/kickbacks/magic powers from any of the companies mentioned here. All products or services mentioned were purchased by me.**
Tuesday, April 17, 2012
How to Buy Interchangeable Knitting Needles
It has been over a year since I wrote a blog post about my fancy shiny new set of Addi Lace Click interchangeable knitting needles. In that time I've done a ton of knitting and a fair amount of research on interchangeable sets so I decided it was time to put my thoughts down in one place for folks looking to purchase interchangeable needle sets. This article is not going to tell you what to buy but it will tell you what to think about before you purchase. Interchangeable crochet hook sets are also available but I crochet about as well as I water ski.
Keep in mind that you can also create your own needle sets by buying the cables and tips individually. The information below can be useful to help you decide whether a full set is right for you.
An interchangeable needle set consists of multiple size needle tips that you can connect to separate cables to create circular needles. Most sets come with a variety of cable lengths. Other accessories available for purchase or included in some sets are cable connectors (to join more than one cable together to make a longer cable), stops (if you want to take the tips off a work in progress and leave them on the cable, you can screw a stop onto the end of the cable, keeping the live stitches from falling off), storage cases and cables or tips of additional sizes. For the purposes of this article, "Needle tip" refers to the part of the interchangeable set that you join onto a cable and "needle point" refers to the tapered end to the needle tip that is inserted into live stitch. "Join" refers to the mechanism that connects the tip to the cable.
Interchangeable sets, while cool, are not the right choice for everyone. Some reasons you might make the investment are...
Material
Folks new to knitting will find that there are as many types of knitting needles as there are knitter. Needles can be found in a variety of materials. Some of the most common are metal, plastic/acrylic, bamboo and wood. No needle material is better than the other, honestly. In a pinch, any needle will do but most knitters have preferences that they develop over time. Many knitters (especially beginners) like a smooth but not slick surface, or even surfaces with a little bit of drag to reduce needles-slipping-out-hysterical-panic situations. Other knitters like their needles as slick as possible to increase their speed. Aside from surface and finish, different materials just FEEL different in your hands. Some knitters love the way wood warms to their touch and gives ever so slightly while some like the cool, light-weight firmness of metal. This is something you need to experiment with before investing in a needle set. Higher end companies like Lantern Moon and others also produce beautiful rosewood and ebony interchangeable sets.
Now that you've thought about your materials you've narrowed down your selection a bit. If you are interested in more than one material even after testing fixed circular needles but definitely want a set, you have two ways to go. You can create your own set by buying individual tips or you can choose your favorite material from a manufacturer that offers sets made of multiple materials. For example, you could buy the complete metal set you love from a manufacturer that also makes the bamboo you adore. In time you can add the bamboo tips to your collection and use them with the cables from your metal set. Knitpicks, Skacel and Knitter's Pride all offer multiple needle materials - I'm sure there are others as well! If you are going to try this route, test out fixed circs in both materials before buying a complete set.
Now let's get into the real particulars. These don't matter to every knitter but if you find yourself special-ordering your needles online because you can't stand X or Y about the needles available in your local stores, then you should consider what you like and dislike about the needles you use.
Tip Length
A first deciding feature among interchangeable needle sets is length of the needle tip. This relates directly to the comfort of knitting as well as to the complete needle length you are able to make with the cable. Most interchangeable needle tips range from 4.5" to 5" in order to be comfortable in the hand to most knitters. The downside of this length tip is that the shortest complete needle length yo can make is (usually) 24".
The knitters who have an issue with this are people who do the majority of their knitting on 16" or 20" needles. If this is your game, consider Addi Click Lace needles by Skacel. With 3.25" tips, they are specifically designed for smaller circumference knitting and come with cables that will join to make 16" and 20" complete needles. For folks unused to the short tip length of shorter cable needles, consider that many folks complain of hand pain from this tip of needle.
Joins
As I mentioned above "join" refers to the mechanism that connects the tip to the cable. This usually a screw on or locking mechanism. Some screw-on mechanisms come with a tightening tool - use it Every Dang Time. I'm not kidding. Even if you tighten them as tight as you can by hand, your cable can come unscrewed. Want to know the fun part? If your cable comes unscrewed while you are watching TV or otherwise distracted, you might not notice and keep knitting ... dropping your whole row. Keep in mind that this won't happen if you use the tool like you are supposed to. Don't let that scare you off ... one of my favorite sets of needles have a join like this. On the other hand, if you know that will irk you, seriously consider not buying a set that uses a tightening tool as part of the join.
Locking mechanism joins don't require a tightening tool. They remind me a bit of the locking join that connects the detachable mixing blade on a Kitchen Aide stand mixer. As long as you attach them properly, they stay tight. So why would anyone buy a set that comes with a tightening tool? The locking mechanism join is only found on certain needle sets. If those needles don't have the other features you want, you need to consider what your top priorities are.
Sharpness and Taper of Needle Point

This is a fabulous comparison shot of needle tapers and sharpness as an example of how tips can vary(photo credit: Jillian Mellen). For some knitters, a needle is a needle. Nuff said. For others however, the right tip really matters. For those needle geeks out there who focus on the minutiae (waving my hand over here), this is an important part of choosing a set. I don't have comparison shots of all the tips out there but take a look at the variation within just these two brands...
These are all size 5/3.75mm needles. From the top:
Skacel Addi Lace (fixed circ shown - Addi lace interchangeable needles are made with the same point shown above but with a different finish than pictured)
Skacel Addi Turbo
Dyakcraft Darn Pretty Metal (Mountain Mist)
Dyakcraft Darn Pretty wood regular
Dyakcraft Darn Pretty Lace
The Long and Short of It
Before buying an interchangeable needle set, I highly recommend buying a fixed set of needles in the material/tip style/tip length you are considering and knitting a WHOLE project on them. Knitting a test swatch in the store is simply not going to give you the data you need to make an educated investment when choosing between sets. While you can easily resell an interchangeable needle set, keep in mind that many other people might dislike the same features you do ... leading you to take a loss in reselling (ask me how I know). While this won't give you information on how you like the join of a particular set, it will help you decide on other features. There is no perfect set, no best set out there ... but with some research you can hopefully find the best set for you.
**I am in no way connected or receive reimbursement/product/kickbacks/magic powers from any of the companies mentioned here. All products mentioned were purchased by me or by the fabulous chiquita who shared her pic, generally using standard shipping which I immediately regretted as it takes too flipping long.**
Keep in mind that you can also create your own needle sets by buying the cables and tips individually. The information below can be useful to help you decide whether a full set is right for you.
An interchangeable needle set consists of multiple size needle tips that you can connect to separate cables to create circular needles. Most sets come with a variety of cable lengths. Other accessories available for purchase or included in some sets are cable connectors (to join more than one cable together to make a longer cable), stops (if you want to take the tips off a work in progress and leave them on the cable, you can screw a stop onto the end of the cable, keeping the live stitches from falling off), storage cases and cables or tips of additional sizes. For the purposes of this article, "Needle tip" refers to the part of the interchangeable set that you join onto a cable and "needle point" refers to the tapered end to the needle tip that is inserted into live stitch. "Join" refers to the mechanism that connects the tip to the cable.
Interchangeable sets, while cool, are not the right choice for everyone. Some reasons you might make the investment are...
- You are tired of digging through piles of circular needles for the right size/length and then not having what you need
- You want to shrink the physical space your needle collection uses (after all, then you have room for more yarn
- You know what you like in circular needles and want a lot of it
- You frequently under/over-estimate the cable length you need for a project and find yourself having to switch needles while knitting. And it irks you.
Material
Folks new to knitting will find that there are as many types of knitting needles as there are knitter. Needles can be found in a variety of materials. Some of the most common are metal, plastic/acrylic, bamboo and wood. No needle material is better than the other, honestly. In a pinch, any needle will do but most knitters have preferences that they develop over time. Many knitters (especially beginners) like a smooth but not slick surface, or even surfaces with a little bit of drag to reduce needles-slipping-out-hysterical-panic situations. Other knitters like their needles as slick as possible to increase their speed. Aside from surface and finish, different materials just FEEL different in your hands. Some knitters love the way wood warms to their touch and gives ever so slightly while some like the cool, light-weight firmness of metal. This is something you need to experiment with before investing in a needle set. Higher end companies like Lantern Moon and others also produce beautiful rosewood and ebony interchangeable sets.
Now that you've thought about your materials you've narrowed down your selection a bit. If you are interested in more than one material even after testing fixed circular needles but definitely want a set, you have two ways to go. You can create your own set by buying individual tips or you can choose your favorite material from a manufacturer that offers sets made of multiple materials. For example, you could buy the complete metal set you love from a manufacturer that also makes the bamboo you adore. In time you can add the bamboo tips to your collection and use them with the cables from your metal set. Knitpicks, Skacel and Knitter's Pride all offer multiple needle materials - I'm sure there are others as well! If you are going to try this route, test out fixed circs in both materials before buying a complete set.
Now let's get into the real particulars. These don't matter to every knitter but if you find yourself special-ordering your needles online because you can't stand X or Y about the needles available in your local stores, then you should consider what you like and dislike about the needles you use.
Tip Length
A first deciding feature among interchangeable needle sets is length of the needle tip. This relates directly to the comfort of knitting as well as to the complete needle length you are able to make with the cable. Most interchangeable needle tips range from 4.5" to 5" in order to be comfortable in the hand to most knitters. The downside of this length tip is that the shortest complete needle length yo can make is (usually) 24".
The knitters who have an issue with this are people who do the majority of their knitting on 16" or 20" needles. If this is your game, consider Addi Click Lace needles by Skacel. With 3.25" tips, they are specifically designed for smaller circumference knitting and come with cables that will join to make 16" and 20" complete needles. For folks unused to the short tip length of shorter cable needles, consider that many folks complain of hand pain from this tip of needle.
Joins
As I mentioned above "join" refers to the mechanism that connects the tip to the cable. This usually a screw on or locking mechanism. Some screw-on mechanisms come with a tightening tool - use it Every Dang Time. I'm not kidding. Even if you tighten them as tight as you can by hand, your cable can come unscrewed. Want to know the fun part? If your cable comes unscrewed while you are watching TV or otherwise distracted, you might not notice and keep knitting ... dropping your whole row. Keep in mind that this won't happen if you use the tool like you are supposed to. Don't let that scare you off ... one of my favorite sets of needles have a join like this. On the other hand, if you know that will irk you, seriously consider not buying a set that uses a tightening tool as part of the join.
Locking mechanism joins don't require a tightening tool. They remind me a bit of the locking join that connects the detachable mixing blade on a Kitchen Aide stand mixer. As long as you attach them properly, they stay tight. So why would anyone buy a set that comes with a tightening tool? The locking mechanism join is only found on certain needle sets. If those needles don't have the other features you want, you need to consider what your top priorities are.
Sharpness and Taper of Needle Point

This is a fabulous comparison shot of needle tapers and sharpness as an example of how tips can vary(photo credit: Jillian Mellen). For some knitters, a needle is a needle. Nuff said. For others however, the right tip really matters. For those needle geeks out there who focus on the minutiae (waving my hand over here), this is an important part of choosing a set. I don't have comparison shots of all the tips out there but take a look at the variation within just these two brands...
These are all size 5/3.75mm needles. From the top:
Skacel Addi Lace (fixed circ shown - Addi lace interchangeable needles are made with the same point shown above but with a different finish than pictured)
Skacel Addi Turbo
Dyakcraft Darn Pretty Metal (Mountain Mist)
Dyakcraft Darn Pretty wood regular
Dyakcraft Darn Pretty Lace
The Long and Short of It
Before buying an interchangeable needle set, I highly recommend buying a fixed set of needles in the material/tip style/tip length you are considering and knitting a WHOLE project on them. Knitting a test swatch in the store is simply not going to give you the data you need to make an educated investment when choosing between sets. While you can easily resell an interchangeable needle set, keep in mind that many other people might dislike the same features you do ... leading you to take a loss in reselling (ask me how I know). While this won't give you information on how you like the join of a particular set, it will help you decide on other features. There is no perfect set, no best set out there ... but with some research you can hopefully find the best set for you.
**I am in no way connected or receive reimbursement/product/kickbacks/magic powers from any of the companies mentioned here. All products mentioned were purchased by me or by the fabulous chiquita who shared her pic, generally using standard shipping which I immediately regretted as it takes too flipping long.**
Monday, March 19, 2012
Mexican-Inspired Stuffed Shells
The children are quietly eating now as I type. Quietly. Eating. (*pausing for dramatic effect*)
I know.
At the market this Sunday, Audrey asked that we buy large pasta shells. Considering she abhors Italian red sauce as well as stuffed pasta of any kind, I was momentarily flummoxed ... until I remembered Pinterest. For the uninitiated, Pinterest is basically a virtual cork board. When you find a recipe/web picture/article you want to save, you create a Board and "pin" it on there. The difference between this and a browser bookmark list is that Pinterest shows you your "pins" as thumbnails, playing on the consumer's visual memory.
Over a month ago I had pinned a recipe for Taco Stuffed Shells. I asked Audrey if she thought she would eat those and tossed the shells in the cart when she nodded. Oooooooook. I didn't expect Maddie to eat the results - she hates chicken, salsa, mixed ingredients ... somebody stop me.
I took to pinterest and, oddly enough, quickly discarded the recipe I'd pinned. After researching a few more recipes, I realized I would need to create my own. Most of the recipes I found used cream cheese to mimic the texture of a traditional Italian stuffed shell. That would never fly with my sensory kiddo, so took the yummiest recipe I could find, halved it (it made A LOT) , tweaked the ingredients and some of the proportions and went from there. If you like a more creamy, traditionally textured stuffed shell, check out the original recipe here on Busy-at-Home.
And the small people are inhaling them.
I know.
Mexican-Inspired Stuffed Shells
2 cups diced or shredded cooked chicken (I used diced rotisserie)
1 can rinsed black beans
4 scallions, chopped
1/2 tsp cumin
1/2tsp Chili con carne seasoning (or chili powder, your own substitute)
1 cup diced bell pepper (your favorite color)
2-3 cups cheddar or similar shredded cheese
1-2 cups salsa/picante sauce/taco sauce (spiciness will increase with cooking ... choose your level of spice wisely)
 1 box large pasta shells
2 tbl oil
Mix first six ingredients together in a large bowl. Add one cup of the shredded cheese and blend. This mixture as it is now can also be used to top nachos, fill burritos or just eat on it's own as a cold chicken salad.
Prepare a large baking dish for the shells by spreading the bottom with your salsa/etc.
Boil a large pot of water and add your oil - this will help your cooled shells not stick together before filling. Cook shells al dente (still firm) or they will be difficult to stand up for filling. Drain and rinse with cool water.
One at a time, hold a cool shell in your hand and scoop in some of the chicken mixture. I found an ice cream scoop like this one made quick work of the task. Each shell held just shy of one scoop. Set the filled shell open-side up on the salsa in the pan. My pan fit twenty Barilla shells, which is perfect for one meal at my house. Big eaters may want to double the recipe above and make two pans. Or more. Repeat this process until you have filled all the shells. . Sprinkle the remaining cheese on top. Cover it with as much as you need to make you weep with cheese goodness. I have no cheese left now, but that's not your problem. Unless you live nearby and deliver cheese...
Preheat oven to 350F degrees. Cover and cook for 20-30 minutes. If you have made this ahead and refrigerated it prior to, place pan in cold oven before turning it on. This will allow the pan to warm up gradually and reduce the risk of exploding glass pans. Because then you will be out a pan AND all that cheesy goodness. Whimper.
 Since everything is cooked in this dish, you are just heating through so you can play fast and loose with the heating times as you wish. I had kids in the shower and kept it cooking longer than I planned but it still turned out fantastic.This recipe also made about two cups more filling than I needed to fill twenty shells ... which will be gone by tomorrow night since the kids keep asking for bowls of it.
This dish doesn't need any additional grains/starches and is well accompanied by cold raw veggies or a crisp salad.
**I am in no way connected or receive reimbursement/product/kickbacks/magic powers from any of the companies mentioned here. All products mentioned were purchased by me, generally using standard shipping which I immediately regretted as it takes too flipping long.**
I know.
At the market this Sunday, Audrey asked that we buy large pasta shells. Considering she abhors Italian red sauce as well as stuffed pasta of any kind, I was momentarily flummoxed ... until I remembered Pinterest. For the uninitiated, Pinterest is basically a virtual cork board. When you find a recipe/web picture/article you want to save, you create a Board and "pin" it on there. The difference between this and a browser bookmark list is that Pinterest shows you your "pins" as thumbnails, playing on the consumer's visual memory.
Over a month ago I had pinned a recipe for Taco Stuffed Shells. I asked Audrey if she thought she would eat those and tossed the shells in the cart when she nodded. Oooooooook. I didn't expect Maddie to eat the results - she hates chicken, salsa, mixed ingredients ... somebody stop me.
I took to pinterest and, oddly enough, quickly discarded the recipe I'd pinned. After researching a few more recipes, I realized I would need to create my own. Most of the recipes I found used cream cheese to mimic the texture of a traditional Italian stuffed shell. That would never fly with my sensory kiddo, so took the yummiest recipe I could find, halved it (it made A LOT) , tweaked the ingredients and some of the proportions and went from there. If you like a more creamy, traditionally textured stuffed shell, check out the original recipe here on Busy-at-Home.
And the small people are inhaling them.
I know.
Mexican-Inspired Stuffed Shells
2 cups diced or shredded cooked chicken (I used diced rotisserie)
1 can rinsed black beans
4 scallions, chopped
1/2 tsp cumin
1/2tsp Chili con carne seasoning (or chili powder, your own substitute)
1 cup diced bell pepper (your favorite color)
2-3 cups cheddar or similar shredded cheese
1-2 cups salsa/picante sauce/taco sauce (spiciness will increase with cooking ... choose your level of spice wisely)
 1 box large pasta shells
2 tbl oil
Mix first six ingredients together in a large bowl. Add one cup of the shredded cheese and blend. This mixture as it is now can also be used to top nachos, fill burritos or just eat on it's own as a cold chicken salad.
Prepare a large baking dish for the shells by spreading the bottom with your salsa/etc.
Boil a large pot of water and add your oil - this will help your cooled shells not stick together before filling. Cook shells al dente (still firm) or they will be difficult to stand up for filling. Drain and rinse with cool water.
One at a time, hold a cool shell in your hand and scoop in some of the chicken mixture. I found an ice cream scoop like this one made quick work of the task. Each shell held just shy of one scoop. Set the filled shell open-side up on the salsa in the pan. My pan fit twenty Barilla shells, which is perfect for one meal at my house. Big eaters may want to double the recipe above and make two pans. Or more. Repeat this process until you have filled all the shells. . Sprinkle the remaining cheese on top. Cover it with as much as you need to make you weep with cheese goodness. I have no cheese left now, but that's not your problem. Unless you live nearby and deliver cheese...
Preheat oven to 350F degrees. Cover and cook for 20-30 minutes. If you have made this ahead and refrigerated it prior to, place pan in cold oven before turning it on. This will allow the pan to warm up gradually and reduce the risk of exploding glass pans. Because then you will be out a pan AND all that cheesy goodness. Whimper.
 Since everything is cooked in this dish, you are just heating through so you can play fast and loose with the heating times as you wish. I had kids in the shower and kept it cooking longer than I planned but it still turned out fantastic.This recipe also made about two cups more filling than I needed to fill twenty shells ... which will be gone by tomorrow night since the kids keep asking for bowls of it.
This dish doesn't need any additional grains/starches and is well accompanied by cold raw veggies or a crisp salad.
**I am in no way connected or receive reimbursement/product/kickbacks/magic powers from any of the companies mentioned here. All products mentioned were purchased by me, generally using standard shipping which I immediately regretted as it takes too flipping long.**
Subscribe to:
Posts (Atom)